KeycloakとSAMLを用いたシングルサインオン可能なSpringアプリケーションの実装
SpringアプリケーションでのKeycloakを利用したSAMLによるシングルサインオン実装方法を説明する。
目次
1.SAML認証とは
2.Keycloakの設定
3.SAML認証のためのライブラリインストール
4.SAML認証実装
5.動作確認
1.SAML認証とは
SAML(Security Assertion Markup Language)は、シングルサインオン(SSO)を実現する際に使用されるプロトコルの一つ。
このプロトコルは、異なるアプリケーション間での認証情報の共有を可能にし、そのためにSAML Assertionと呼ばれるXML形式のデータを使用する。
主に企業内のアプリケーション間で認証とSSOを実現する際に用いられ、セキュアな方法でユーザーの認証情報をアプリケーション間で共有する役割を果たす。
【参考】
◎ SSO認証の仕組みやフロー
◎ SAMLとは
●SAML認証フロー(SP-Initiated)
2.Keycloakの設定
2-1.下記URLからzipファイルダウンロードする。
◎ keycloak
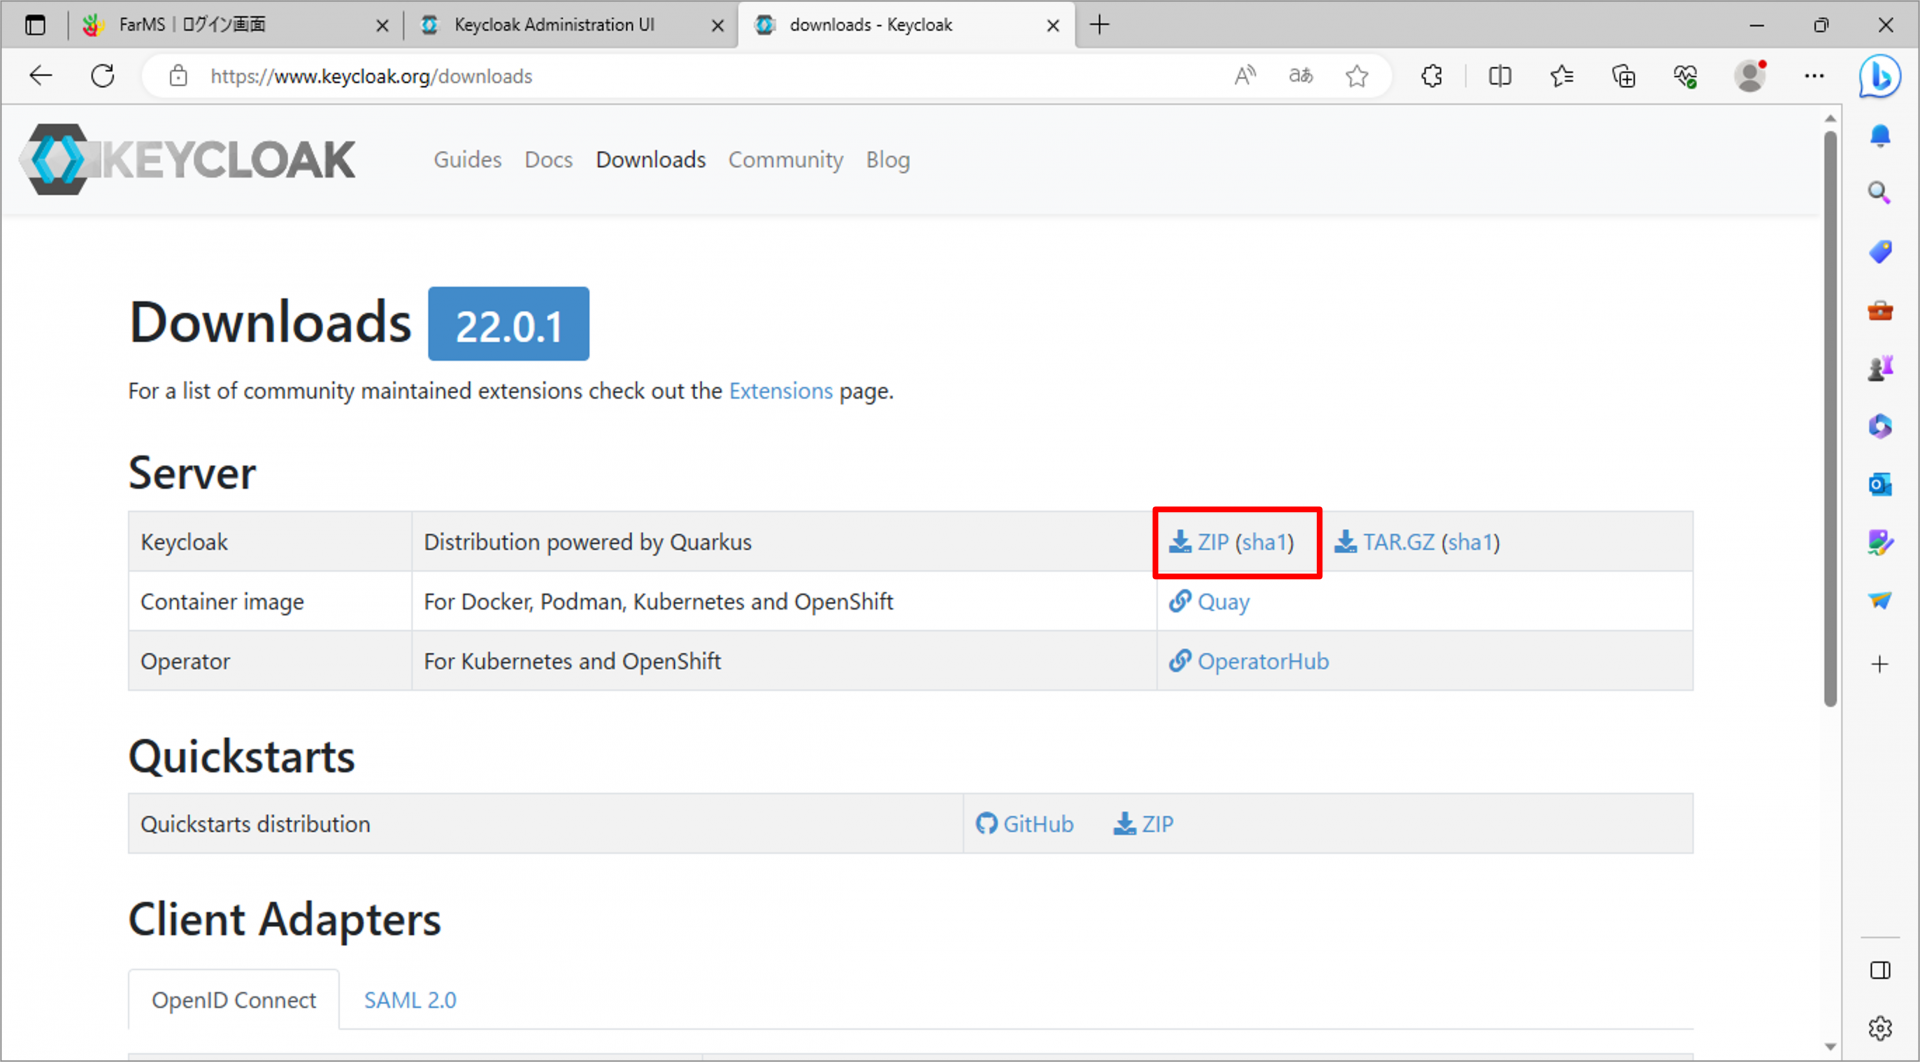
2-2.ダウンロードしたZIPファイルを展開し、適当な場所に配置する。
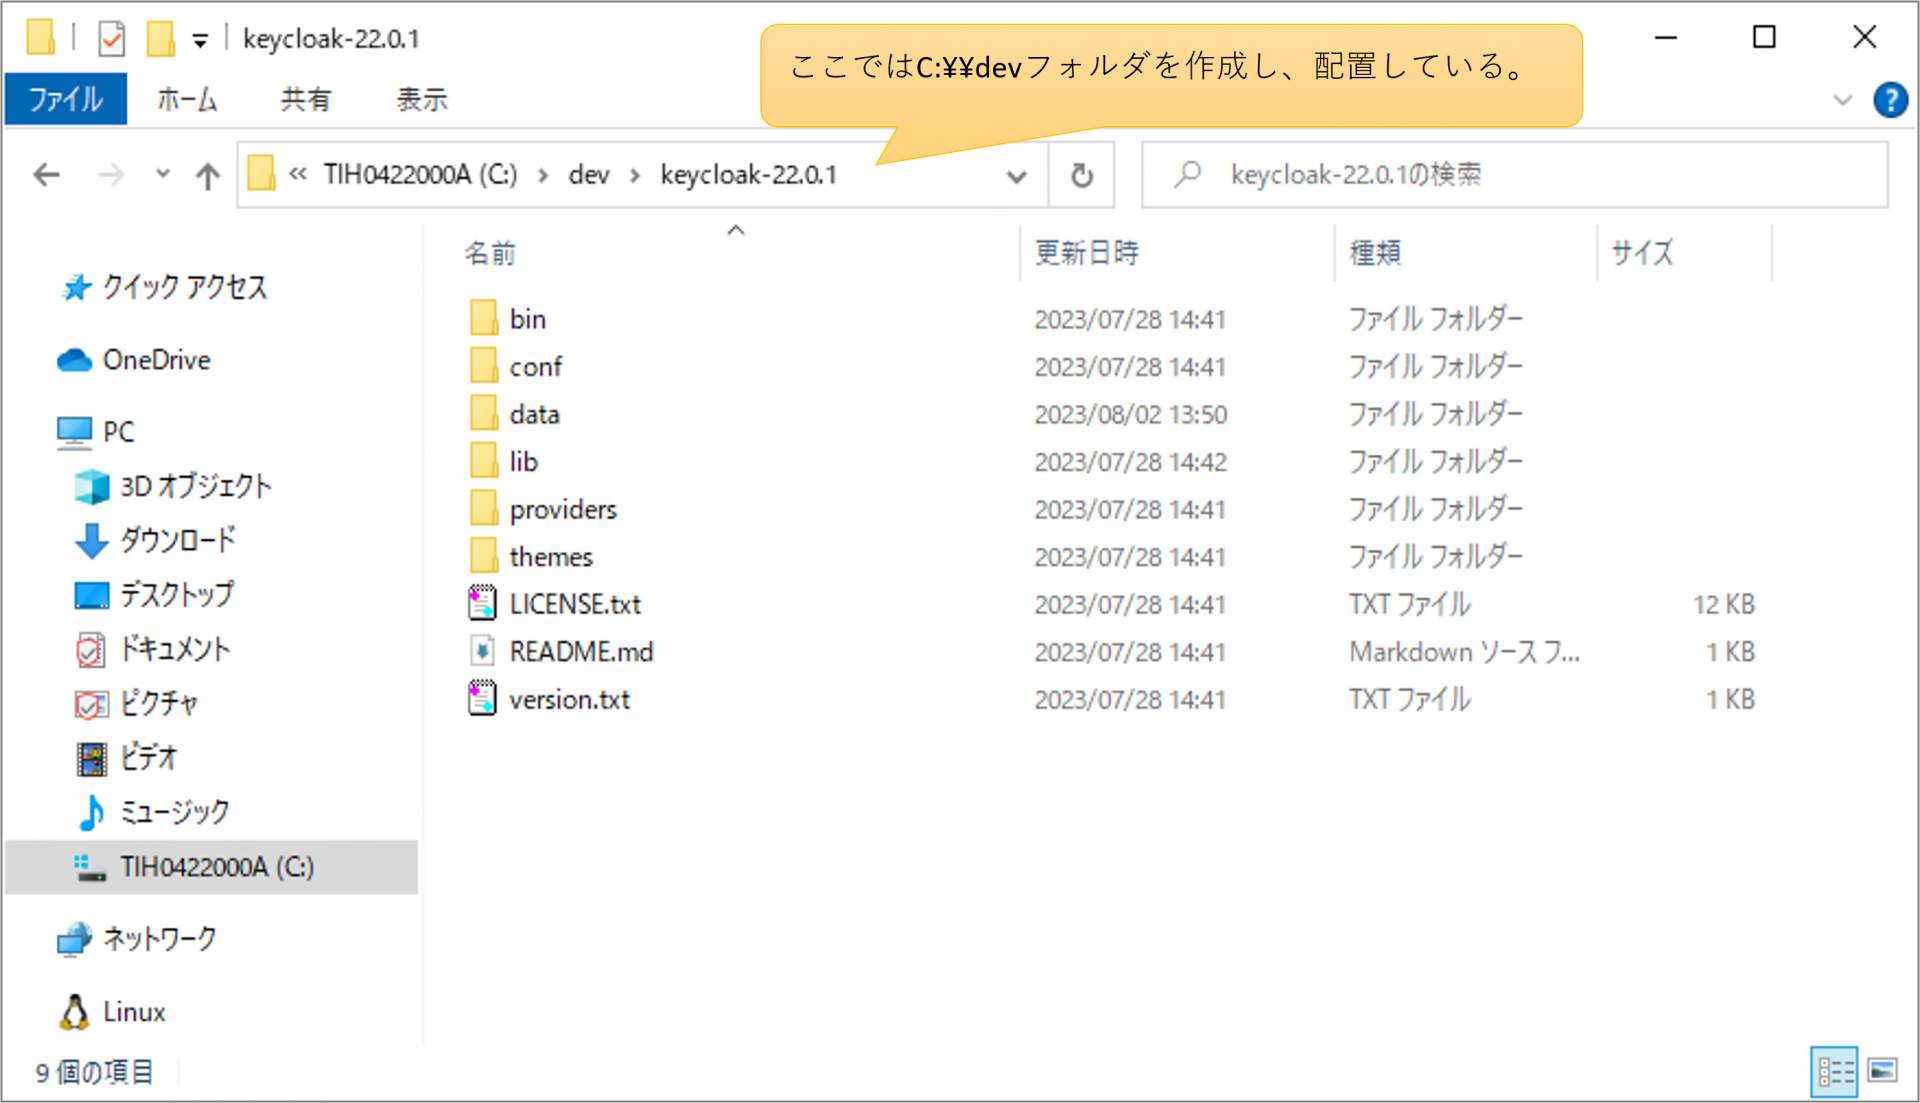
2-3.コマンドプロンプトを起動して、binフォルダ下まで移動し、下記コマンドを実行する。
<Windowsの場合>
下記コマンドを実行
◎参考
kc.bat start-dev --http-port 8081 --log="file" --log-level="INFO"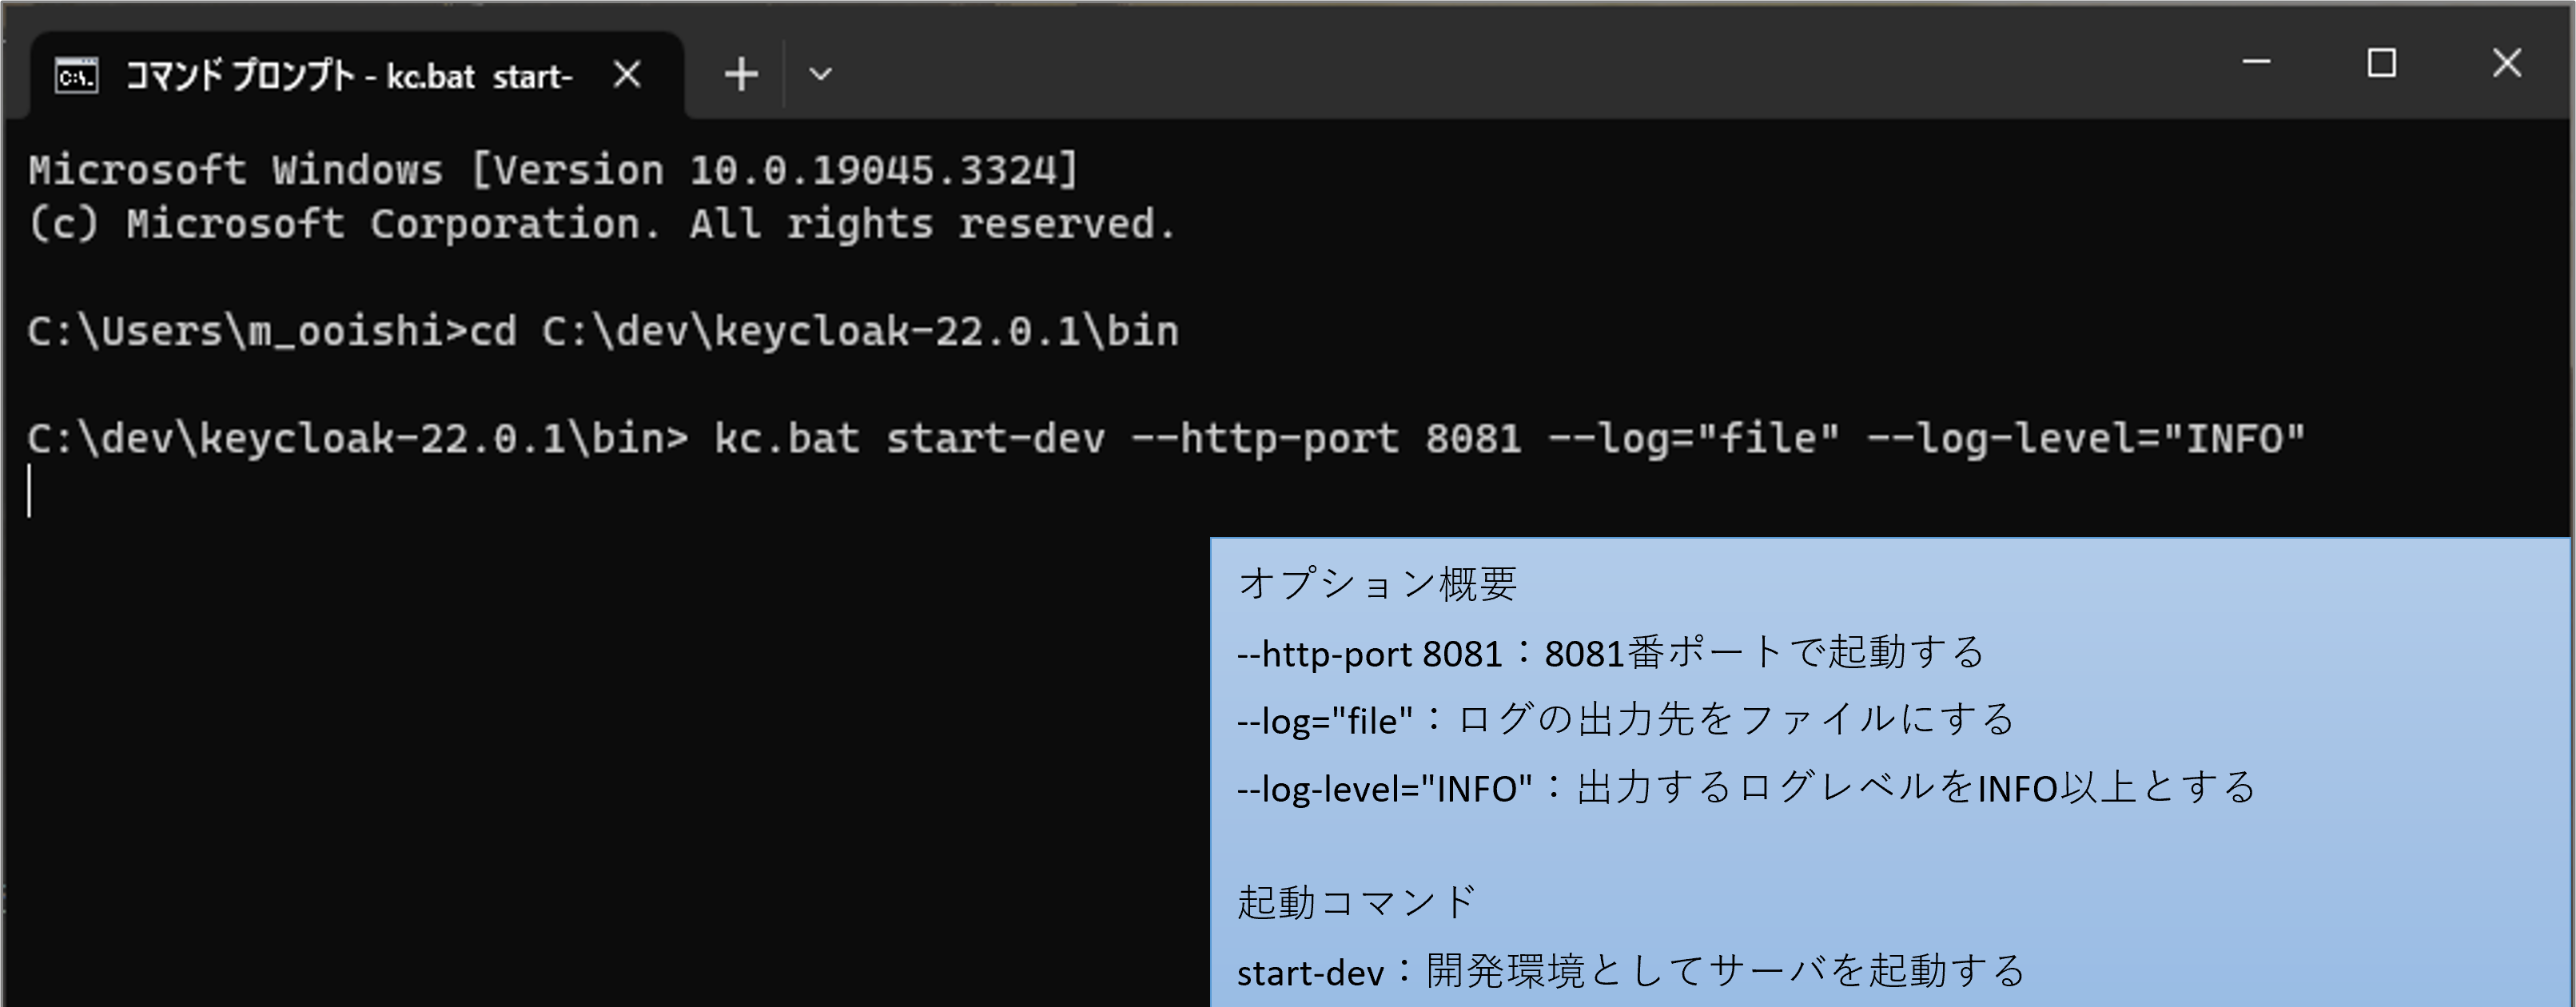
<Linux系の場合>
下記コマンドを実行
./kc.sh start-dev --http-port 8081 --log="file" --log-level="INFO"
コマンド実行により、localhostの8081番ポートでkeycloakが起動する。
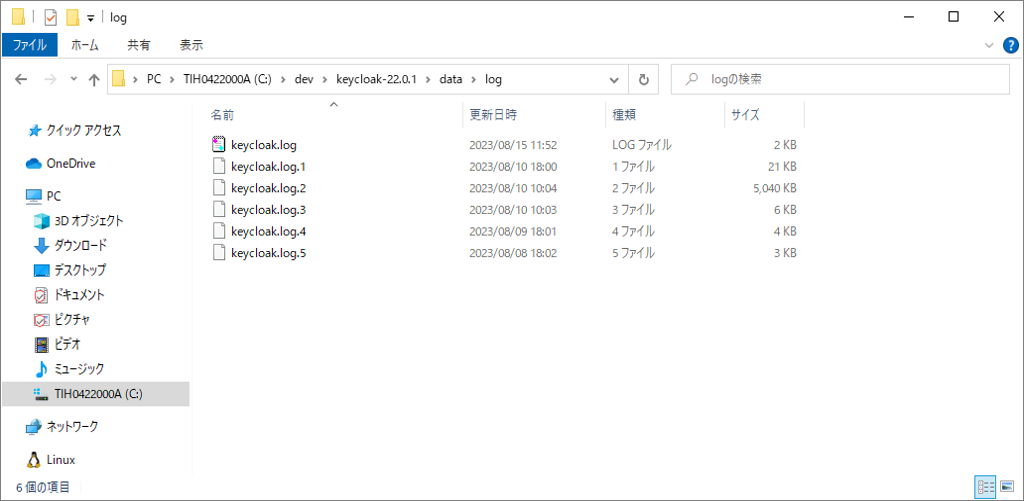
また、ログは『\keycloak-22.0.1\data\log』に記録される。
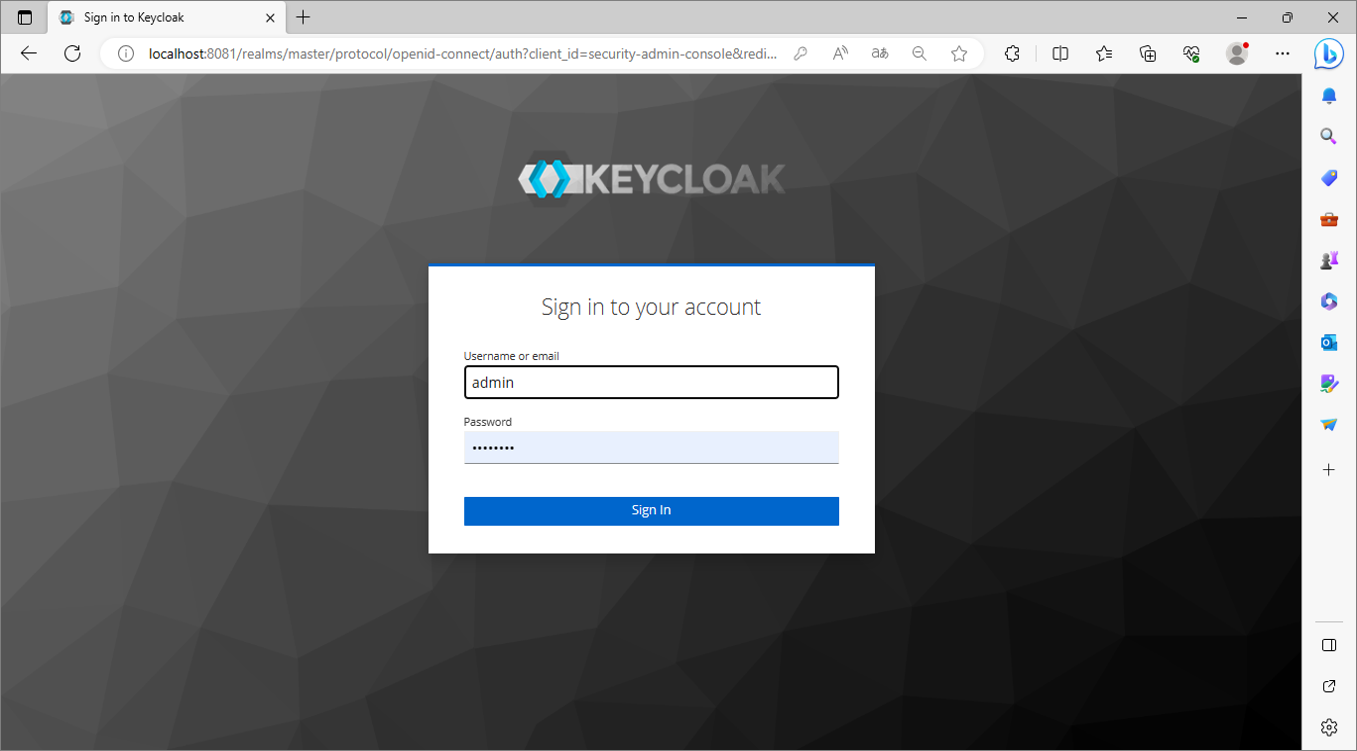
2-4.localhost:8081にアクセスし、管理者アカウントを作成する。 ※「8081」は起動指定したポート番号
UsernameとPasswordを入力して、Createをクリック
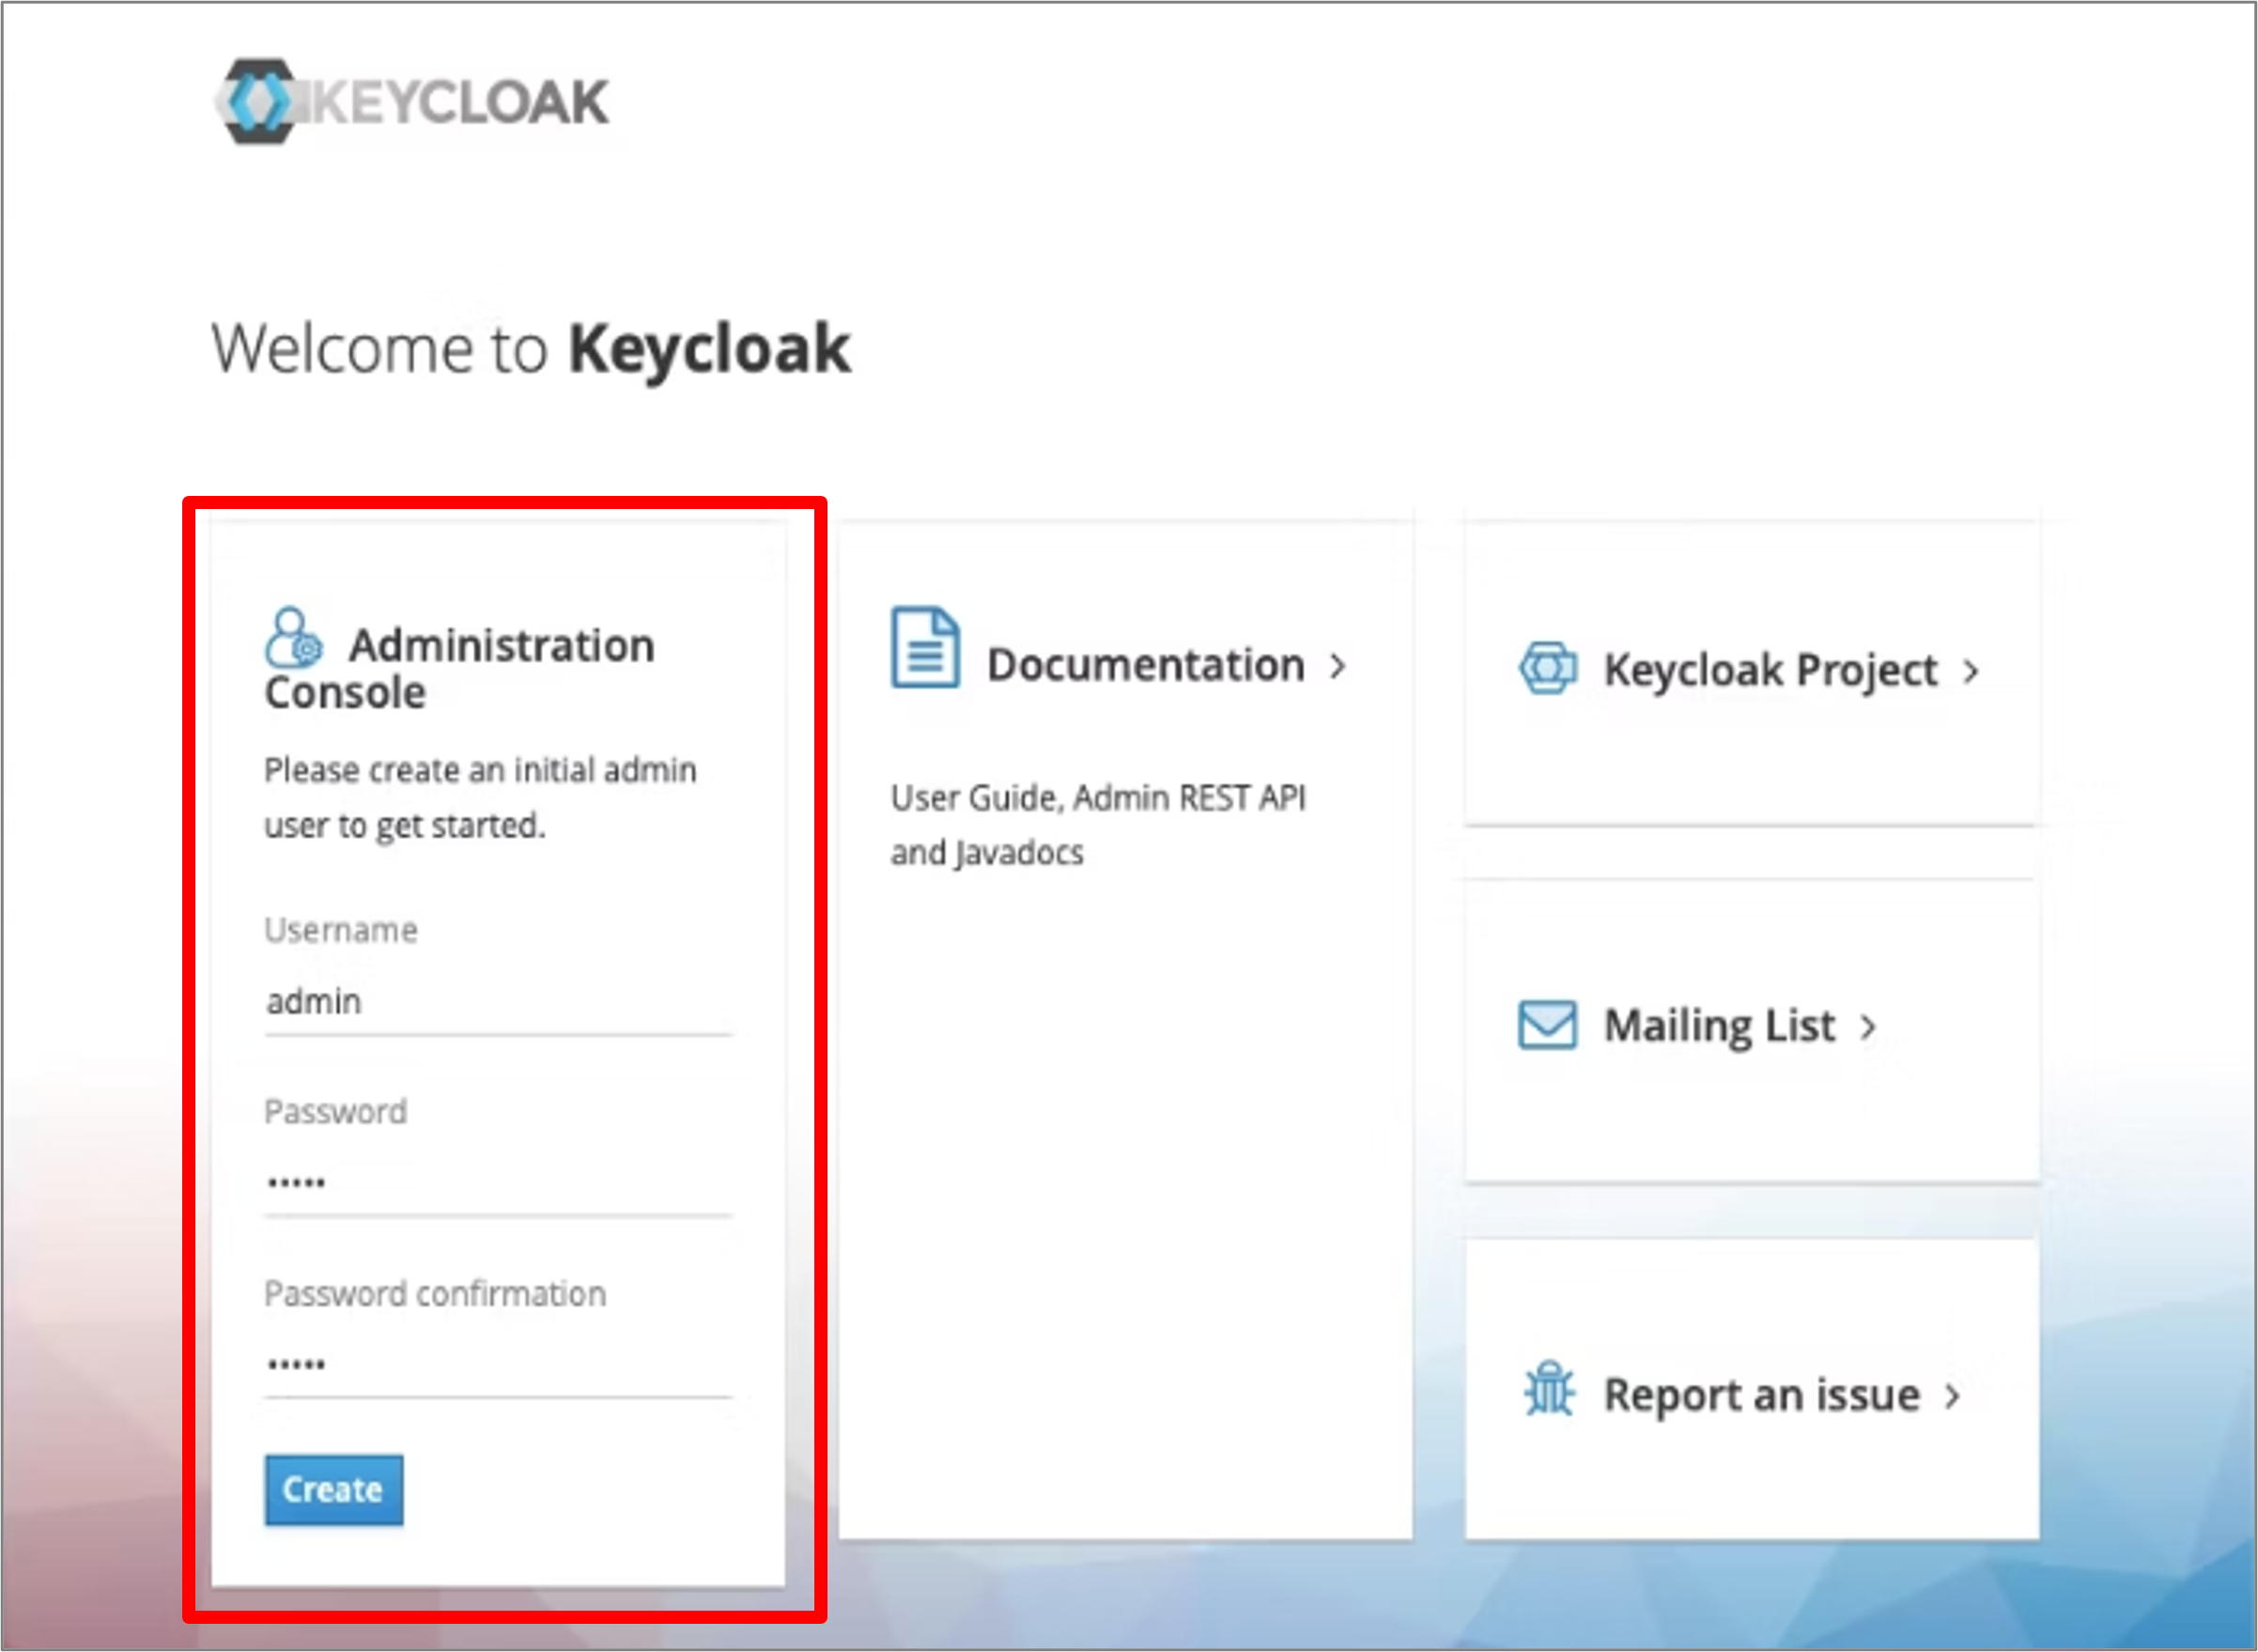
Administration Consoleをクリック
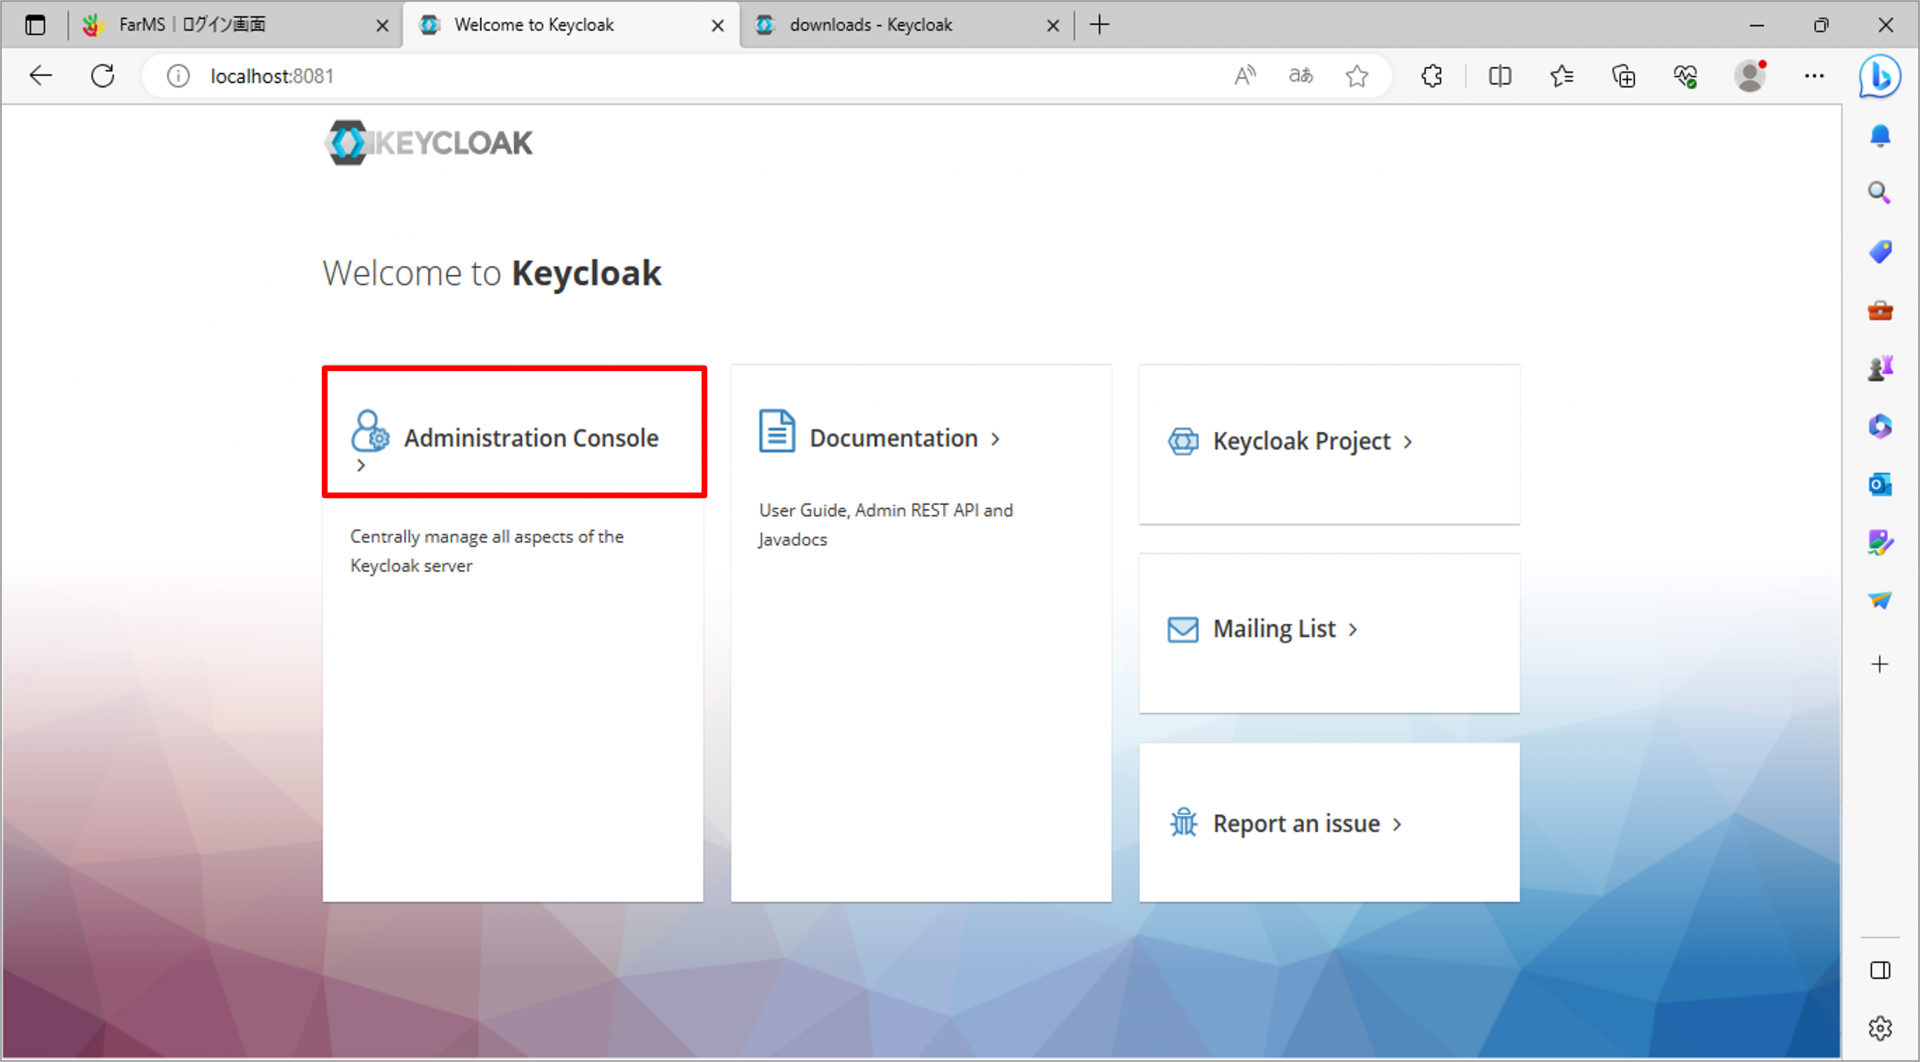
2-5.ログイン画面が出てくるので、先ほど作った管理者アカウントでログイン
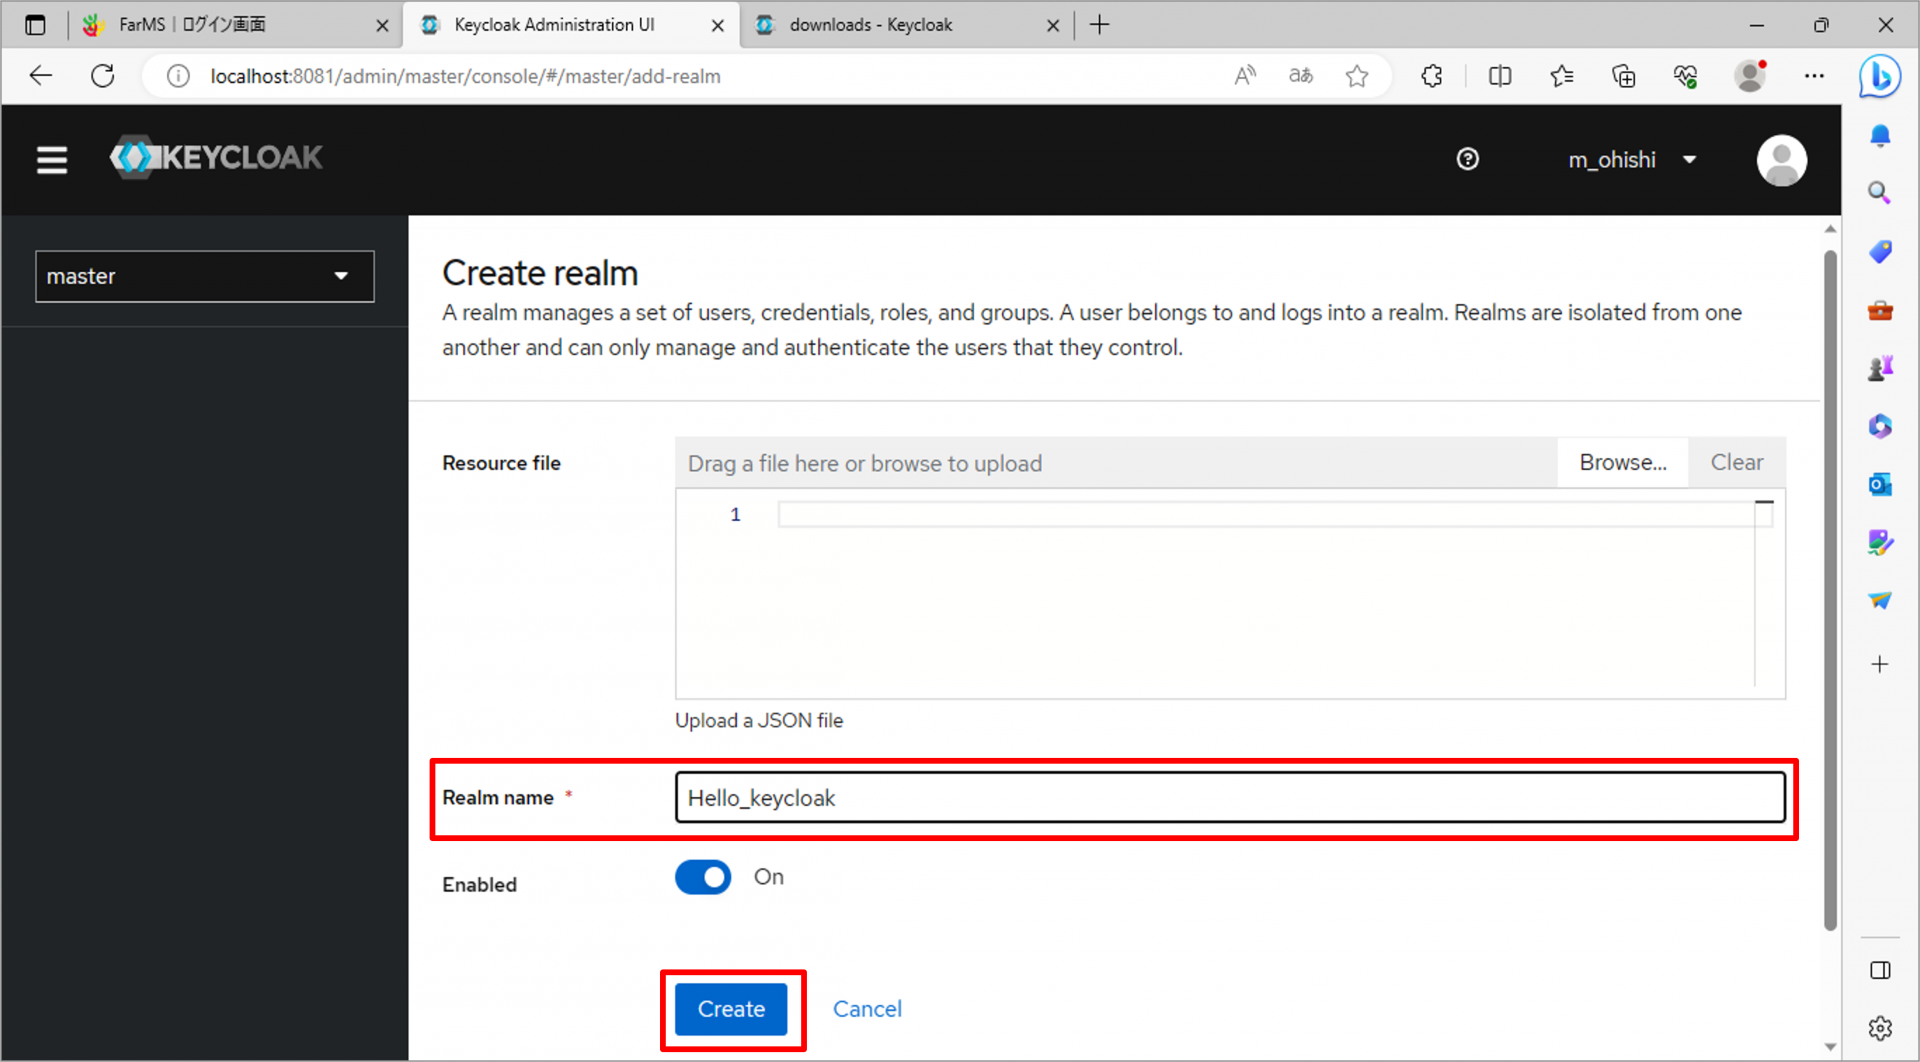
2-6.レルムを作成する。
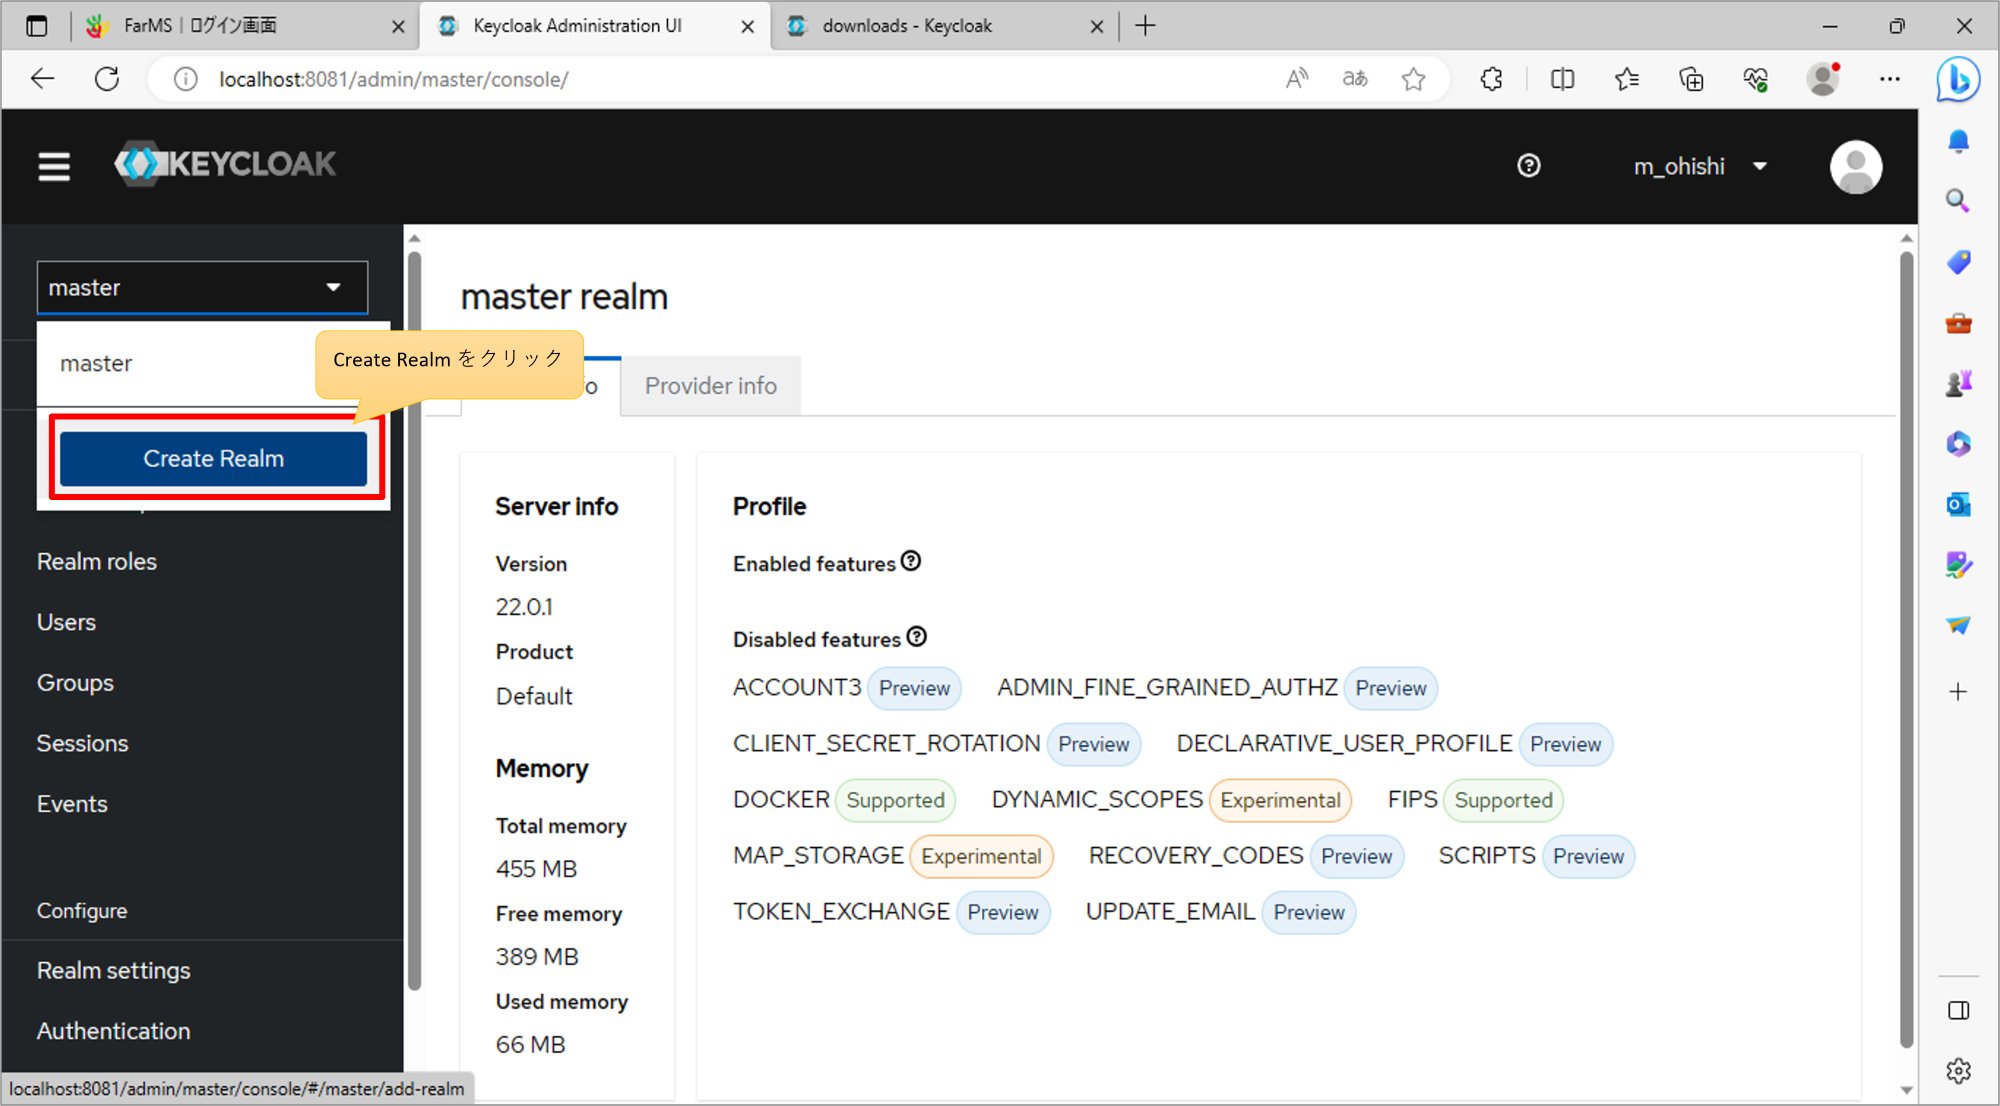
任意の名前を付けて保存する。
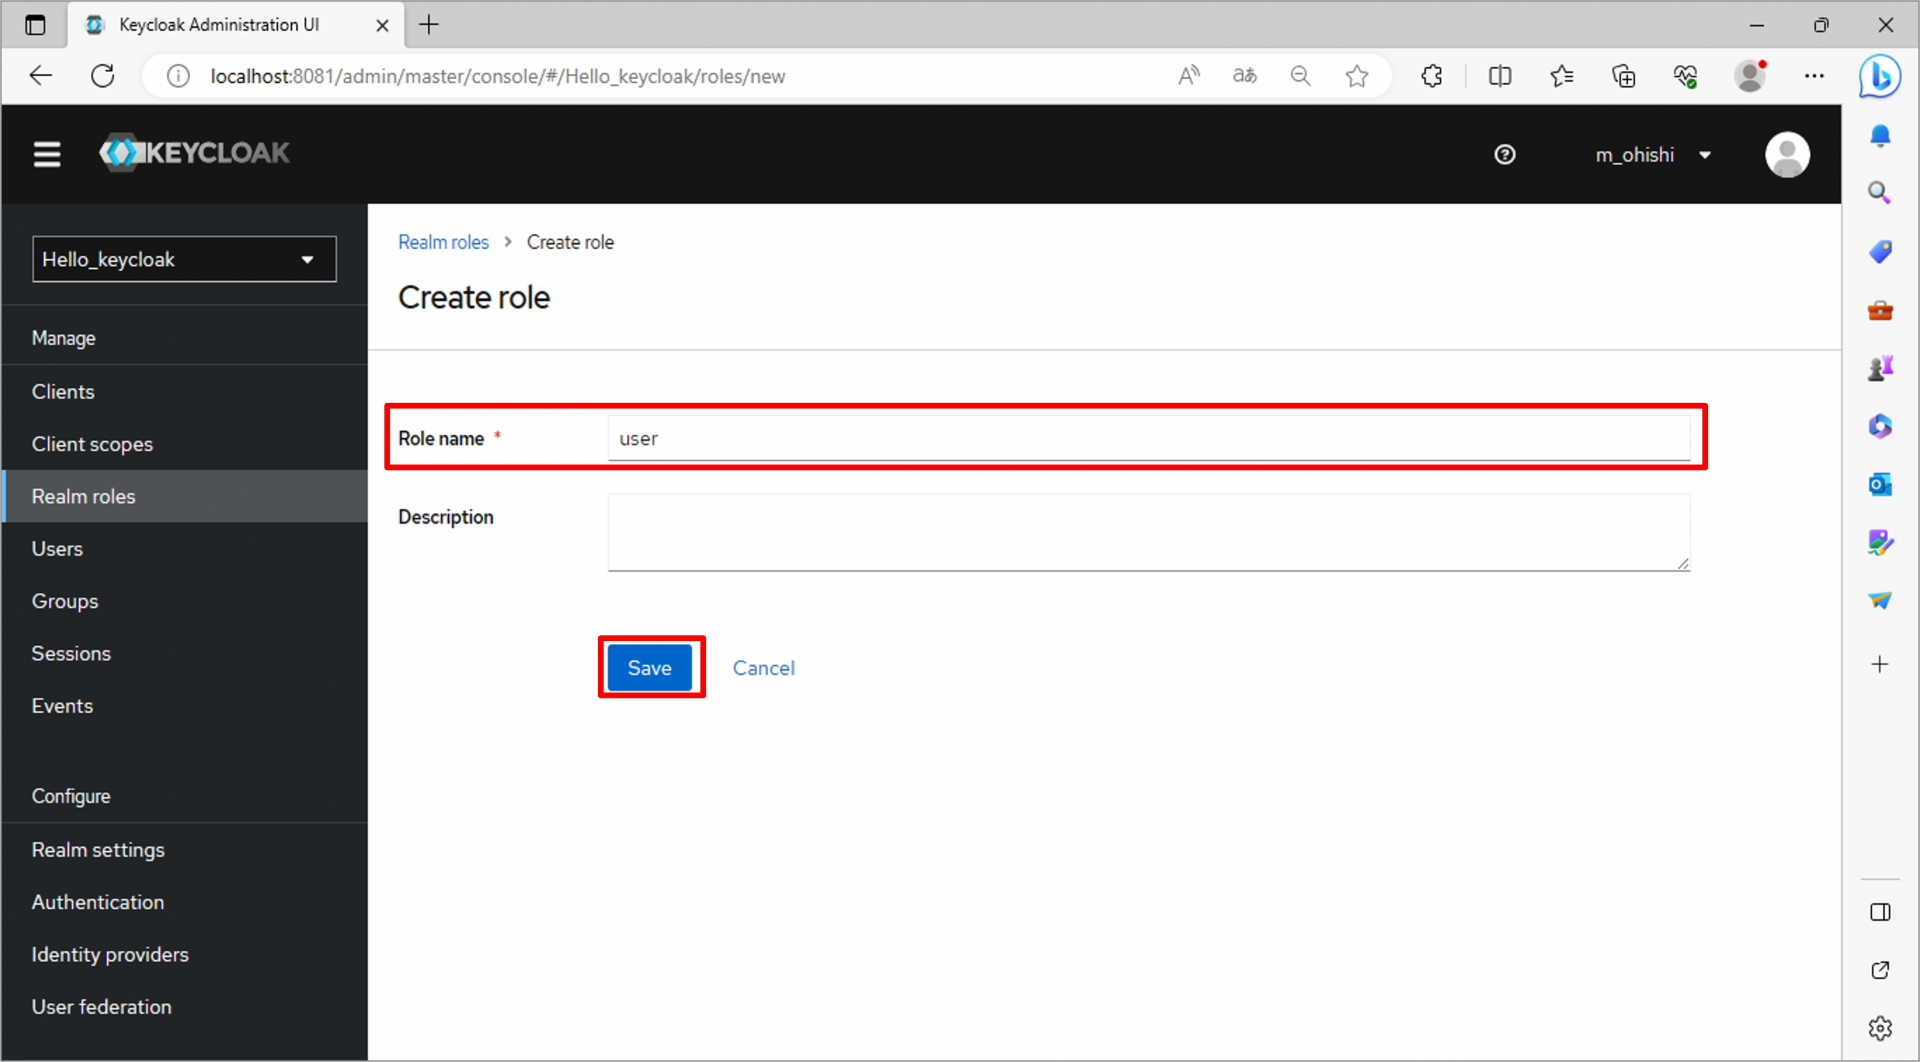
2-7.ロールを作成する。
作成したレルムのRealm rolesタブへ遷移し、Create roleを クリック
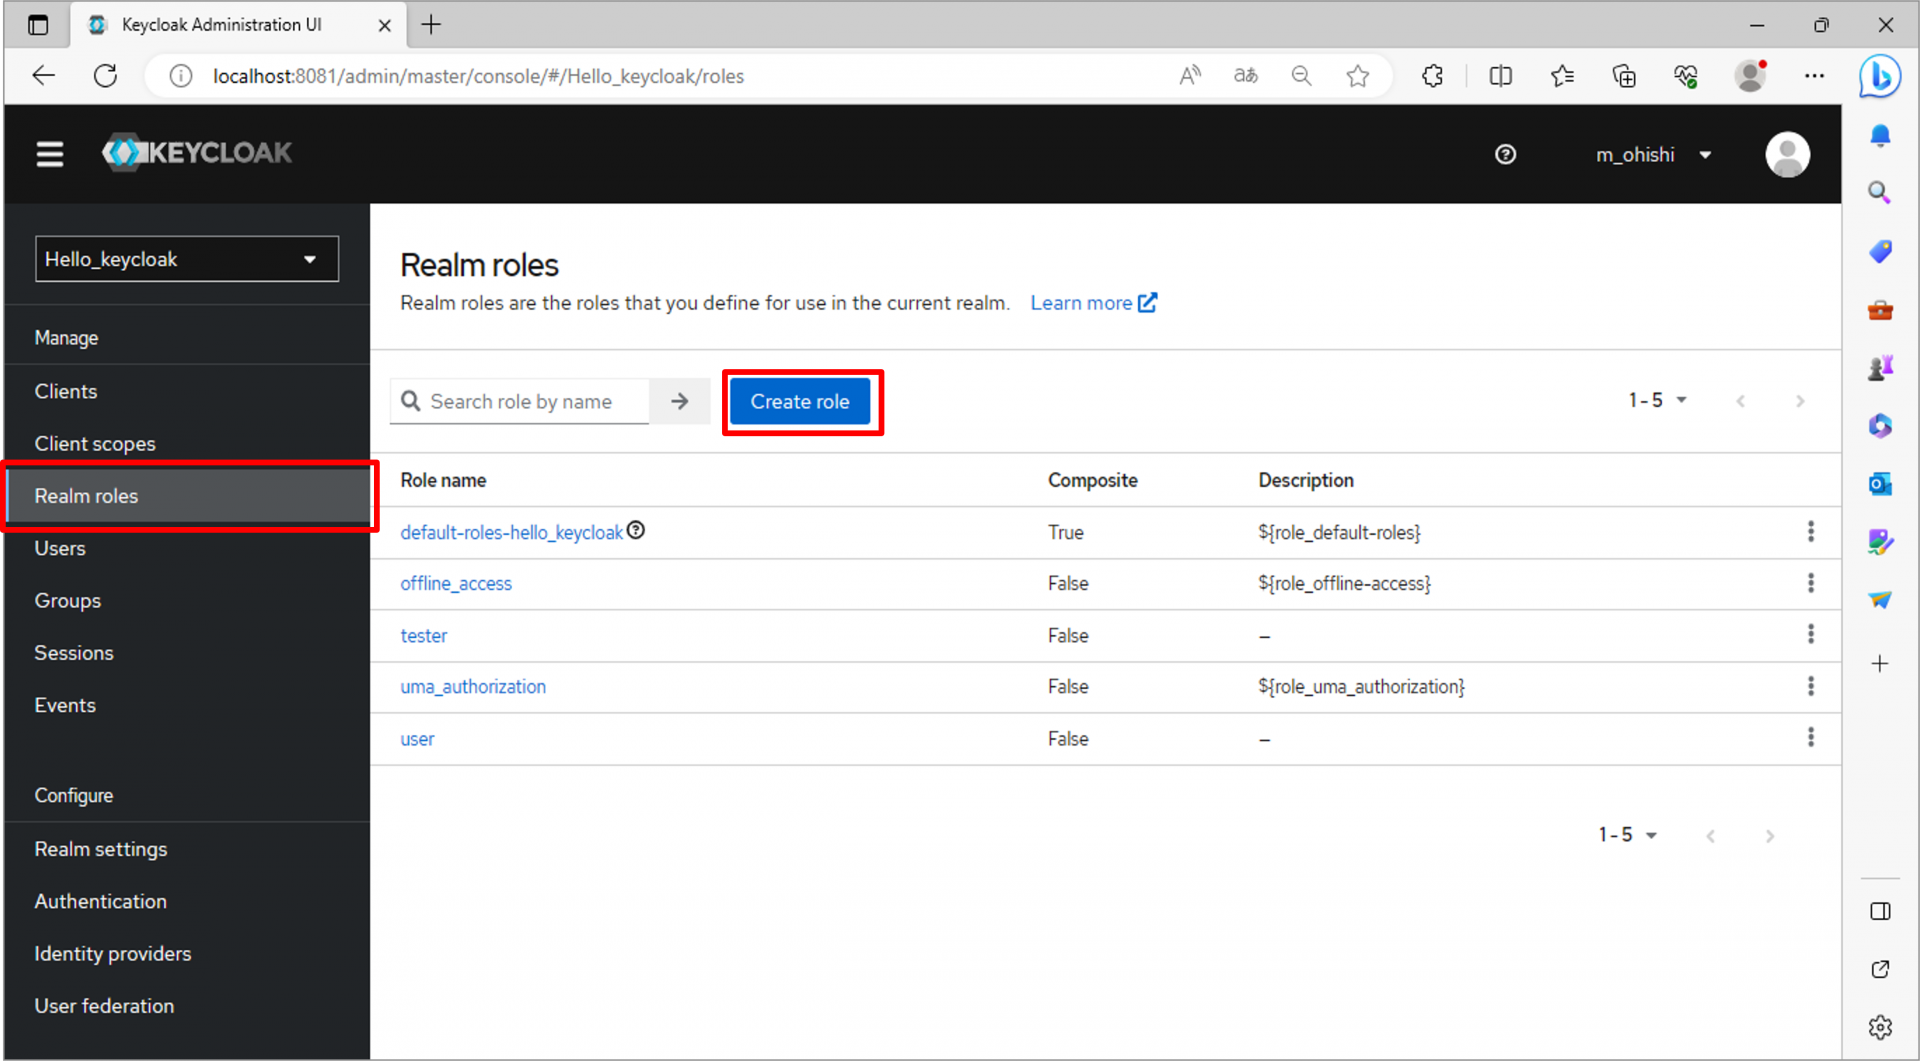
適当なロール名を入力して保存する
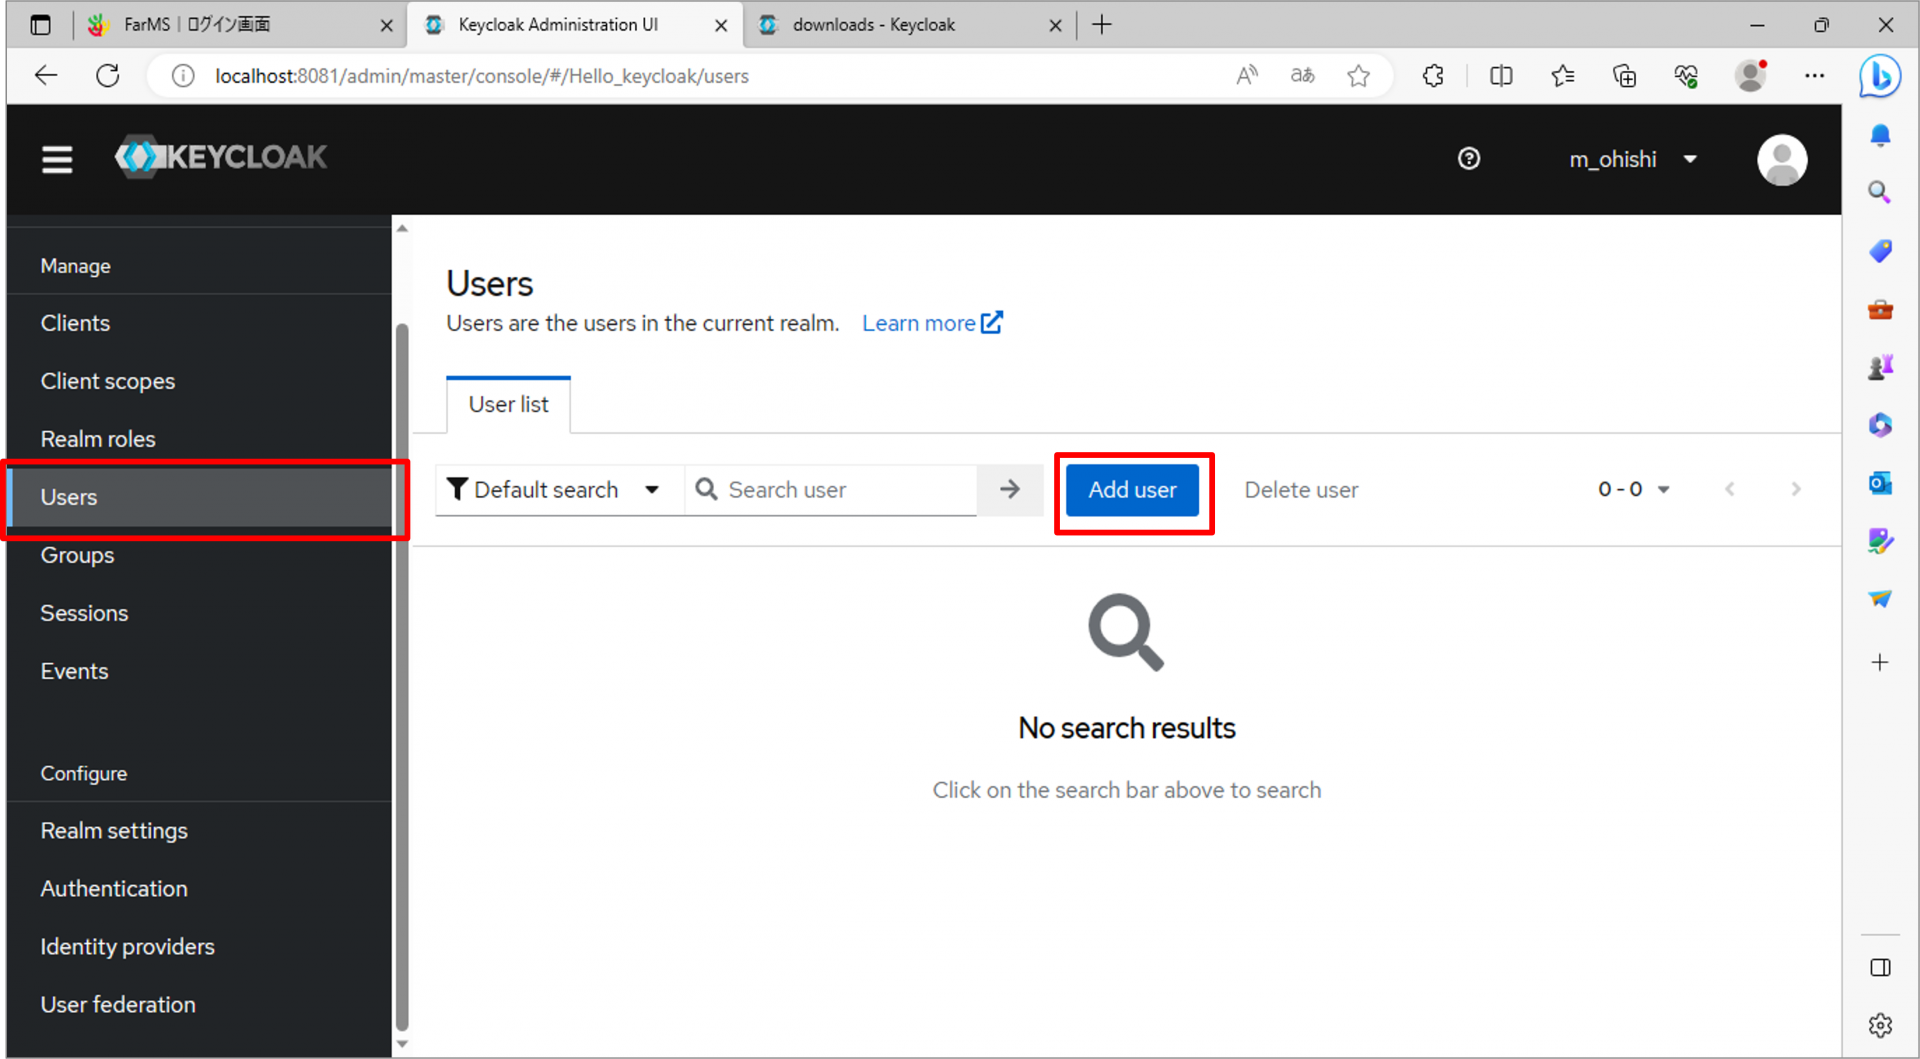
2-8.ユーザーを作成する。
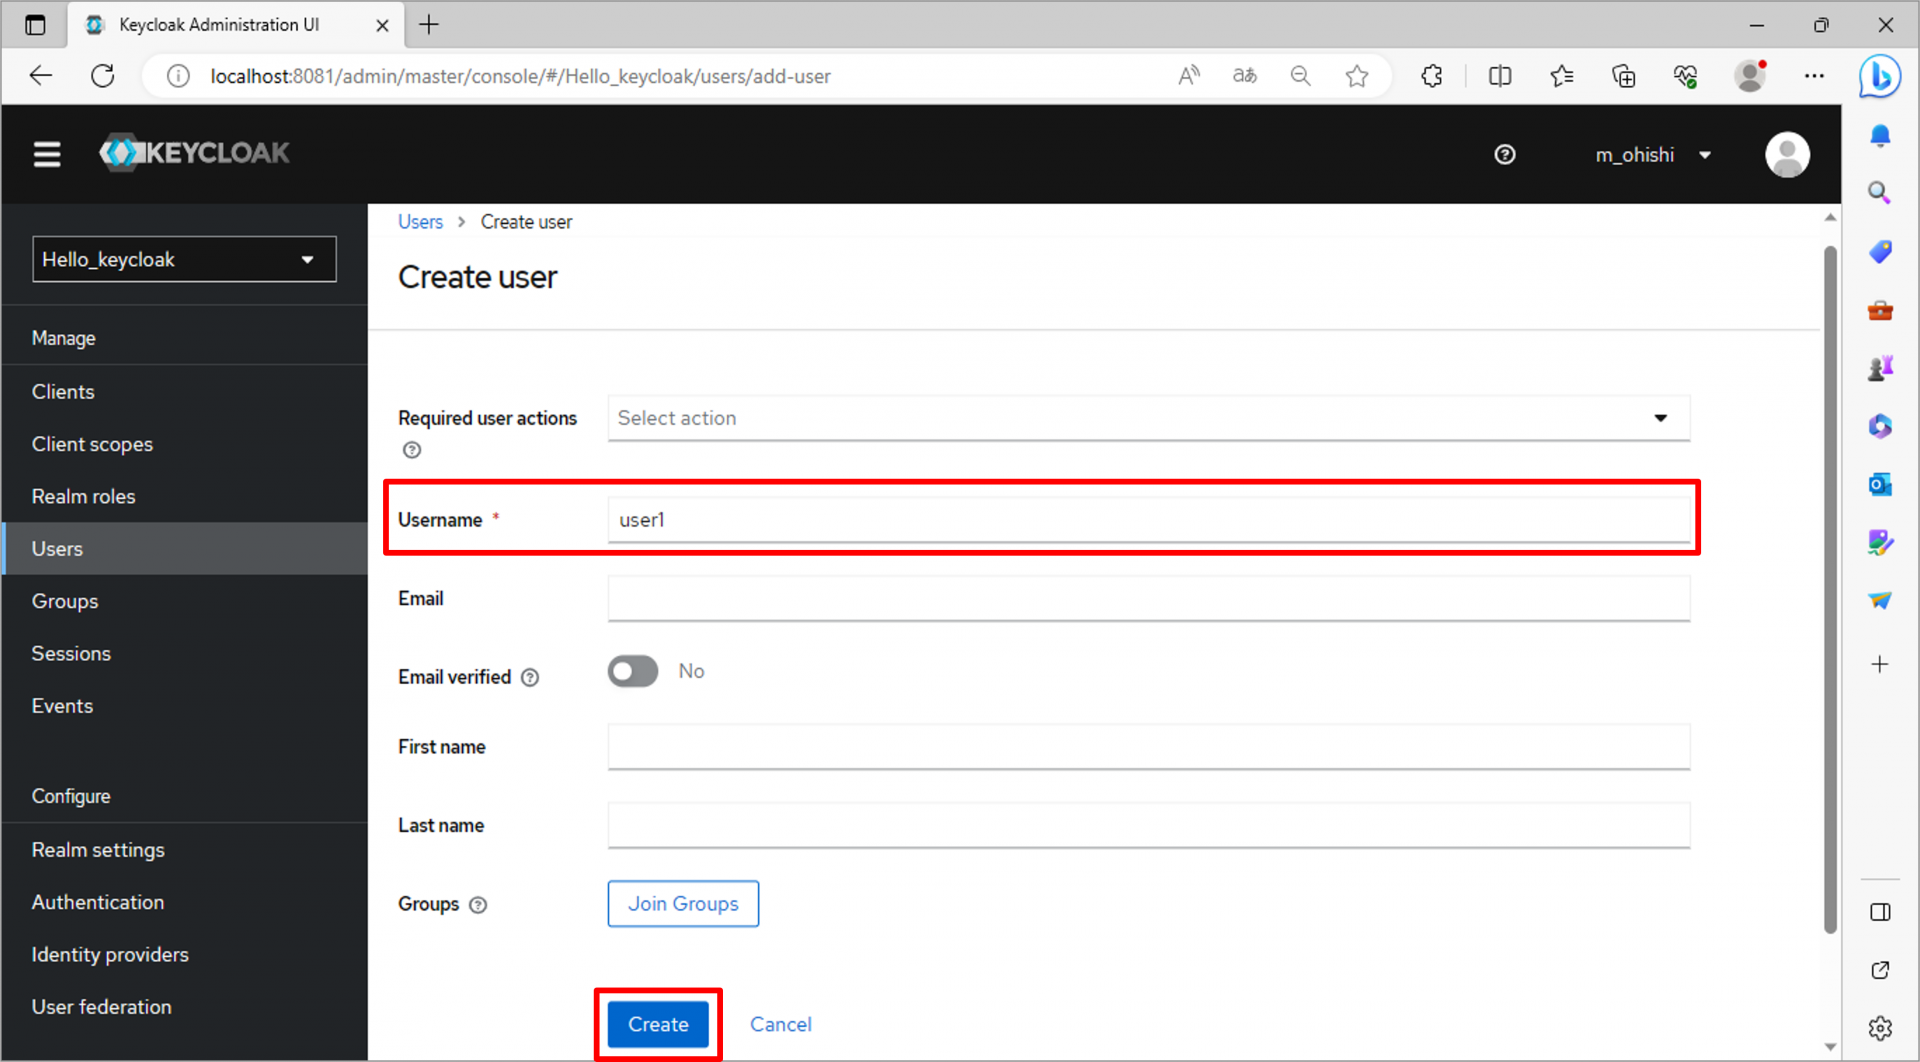
作成したレルムのUsersタブへ遷移し、Add userを クリック
適当なユーザー名を入力して保存。
作成したユーザーをクリック
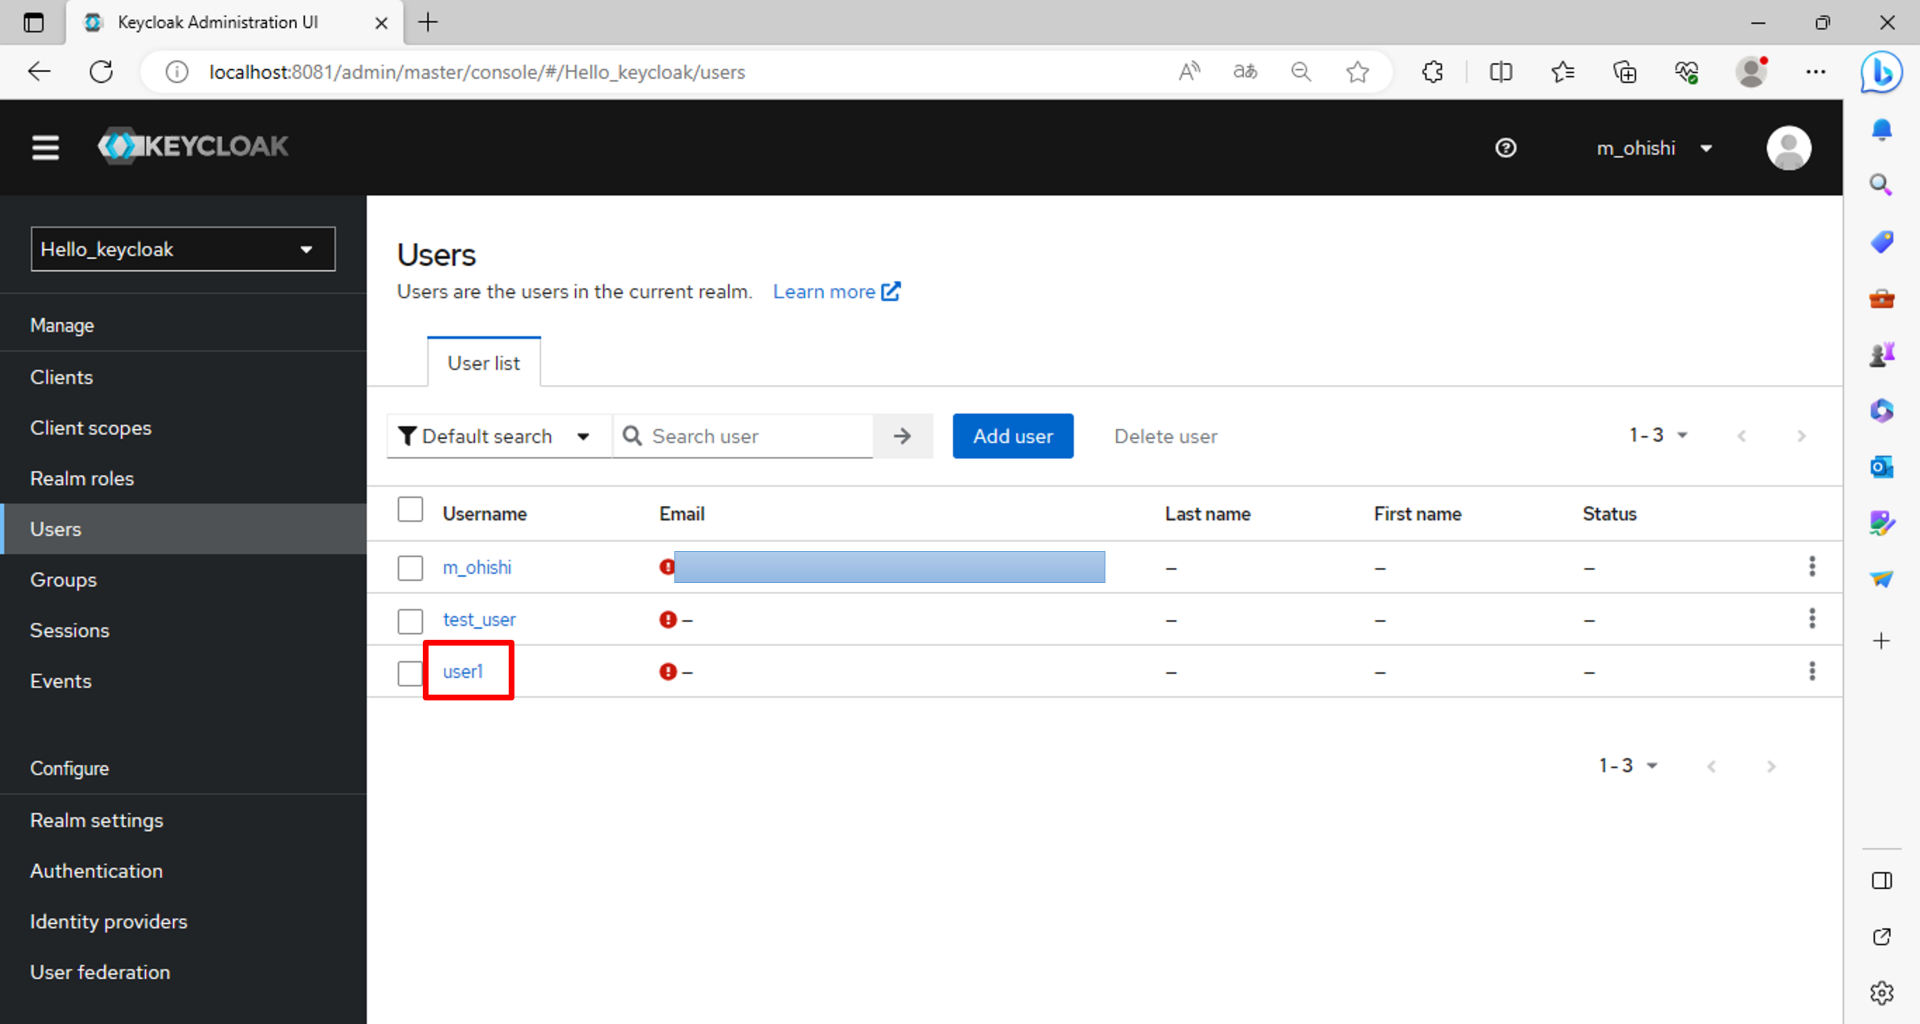
Role mapping タブを開き、Assign role をクリック
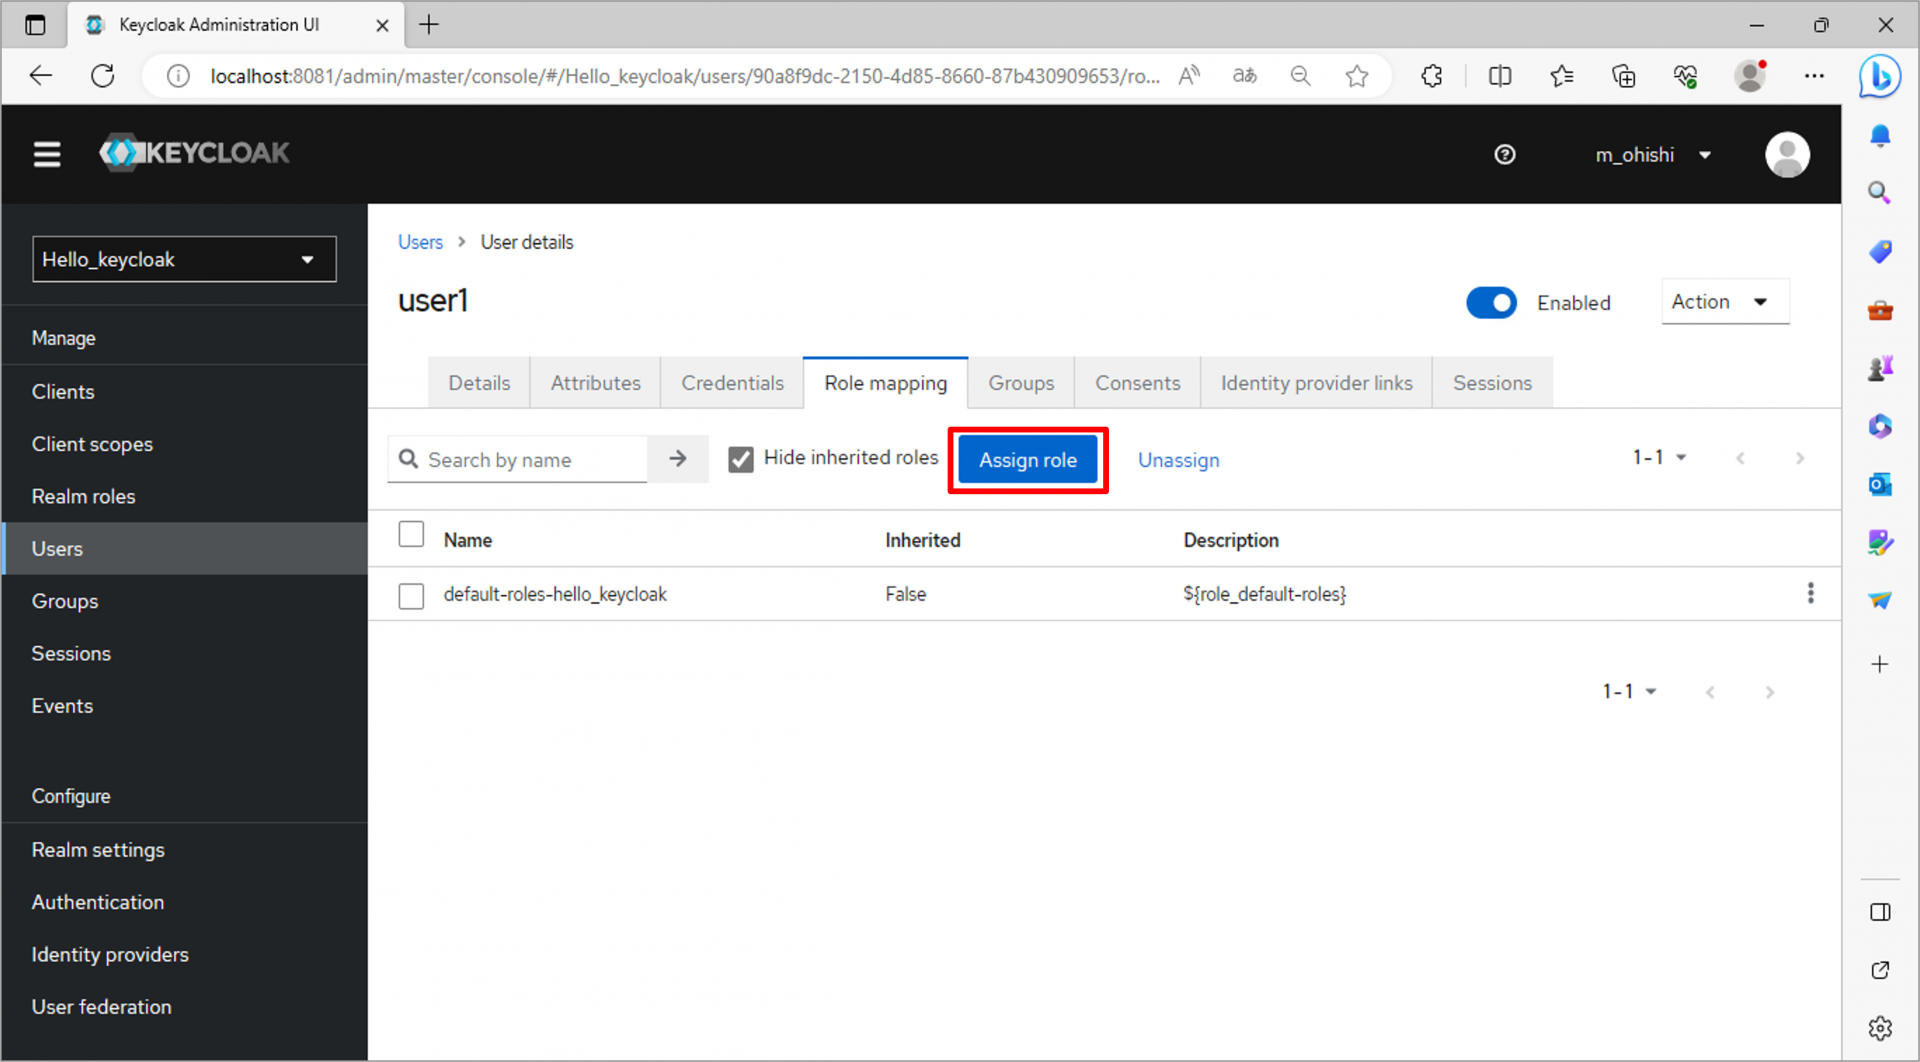
先ほど作成したロールを選択し、Assignする
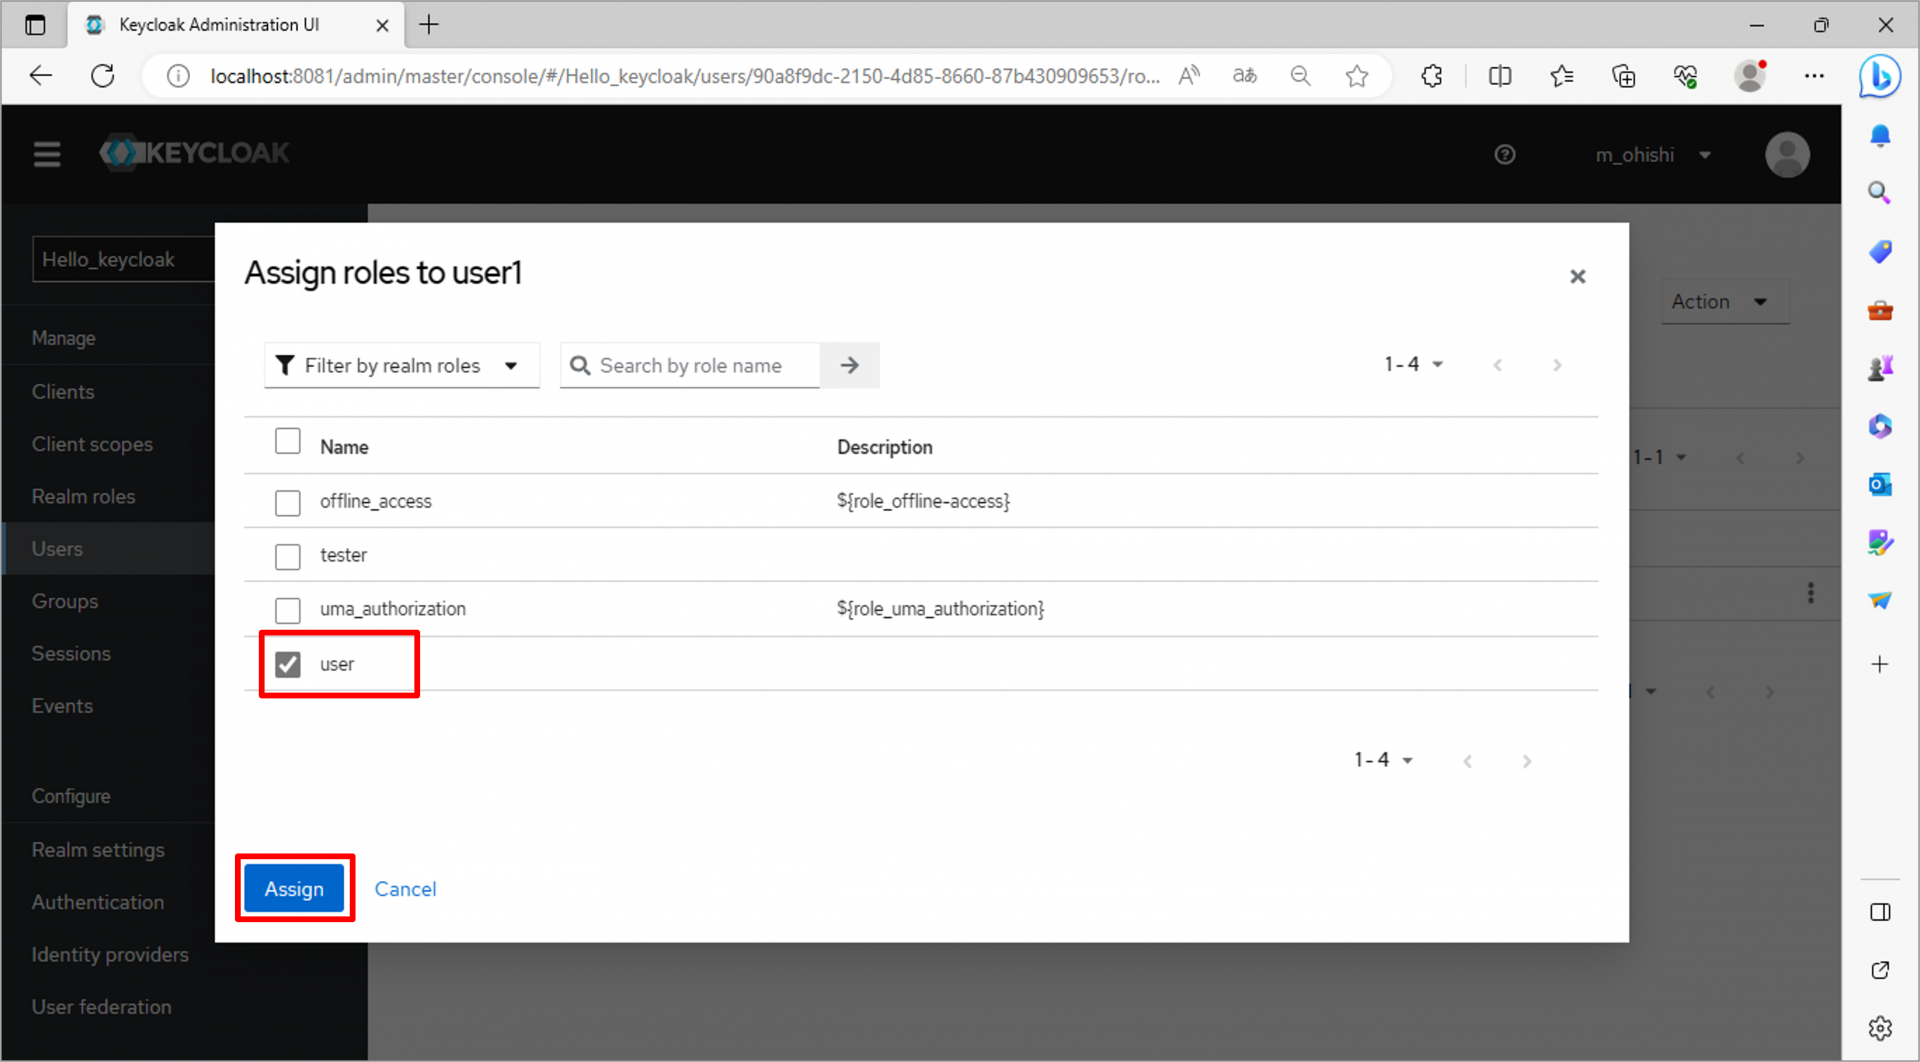
この操作により、ユーザーにロールが割り当てられる。
3.SAML認証のためのライブラリインストール
3-1.pom.xmlの「<dependencies></dependencies>」内に下記ライブラリを5つ追記する。
	:
	<dependencies>
		:
		<!-- ここから -->
		<!-- Spring Security -->
		<dependency>
			<groupId>org.springframework.boot</groupId>
			<artifactId>spring-boot-starter-security</artifactId>
		</dependency>

		<!-- SAML導入 -->
		<!-- https://mvnrepository.com/artifact/org.opensaml/opensaml-core -->
		<dependency>
			<groupId>org.opensaml</groupId>
			<artifactId>opensaml-core</artifactId>
			<version>4.3.0</version>
		</dependency>
		<!-- https://mvnrepository.com/artifact/org.opensaml/opensaml-saml-api -->
		<dependency>
			<groupId>org.opensaml</groupId>
			<artifactId>opensaml-saml-api</artifactId>
			<version>4.3.0</version>
		</dependency>
		<!-- https://mvnrepository.com/artifact/org.opensaml/opensaml-saml-impl -->
		<dependency>
			<groupId>org.opensaml</groupId>
			<artifactId>opensaml-saml-impl</artifactId>
			<version>4.3.0</version>
		</dependency>
		<!-- https://mvnrepository.com/artifact/org.springframework.security/spring-security-saml2-service-provider -->
		<dependency>
			<groupId>org.springframework.security</groupId>
			<artifactId>spring-security-saml2-service-provider</artifactId>
			<version>6.1.2</version>
		</dependency>
		<!-- ここまで -->
		:
	</dependencies>
3-2.org.opensamlの依存関係がエラーとなる場合は、<dependencies>の上に下記を追記する。
		:
	<!-- ここから -->
	<repositories>
		<repository>
			<id>saml-repository</id>
			<name>saml-repository</name>
			<url>https://build.shibboleth.net/nexus/content/repositories/releases/</url>
		</repository>
	</repositories>
	<!-- ここまで -->
	<dependencies>
		:
3-3.ライブラリをインストールする。
①プロジェクトを右クリック>[実行]>[Maven clean]
②プロジェクトを右クリック>[Maven]>[プロジェクトの更新]
③プロジェクトを右クリック>[実行]>[Maven install]
4.SAML認証実装
4-1.SpringSecurityの認証・認可設定ファイル作成
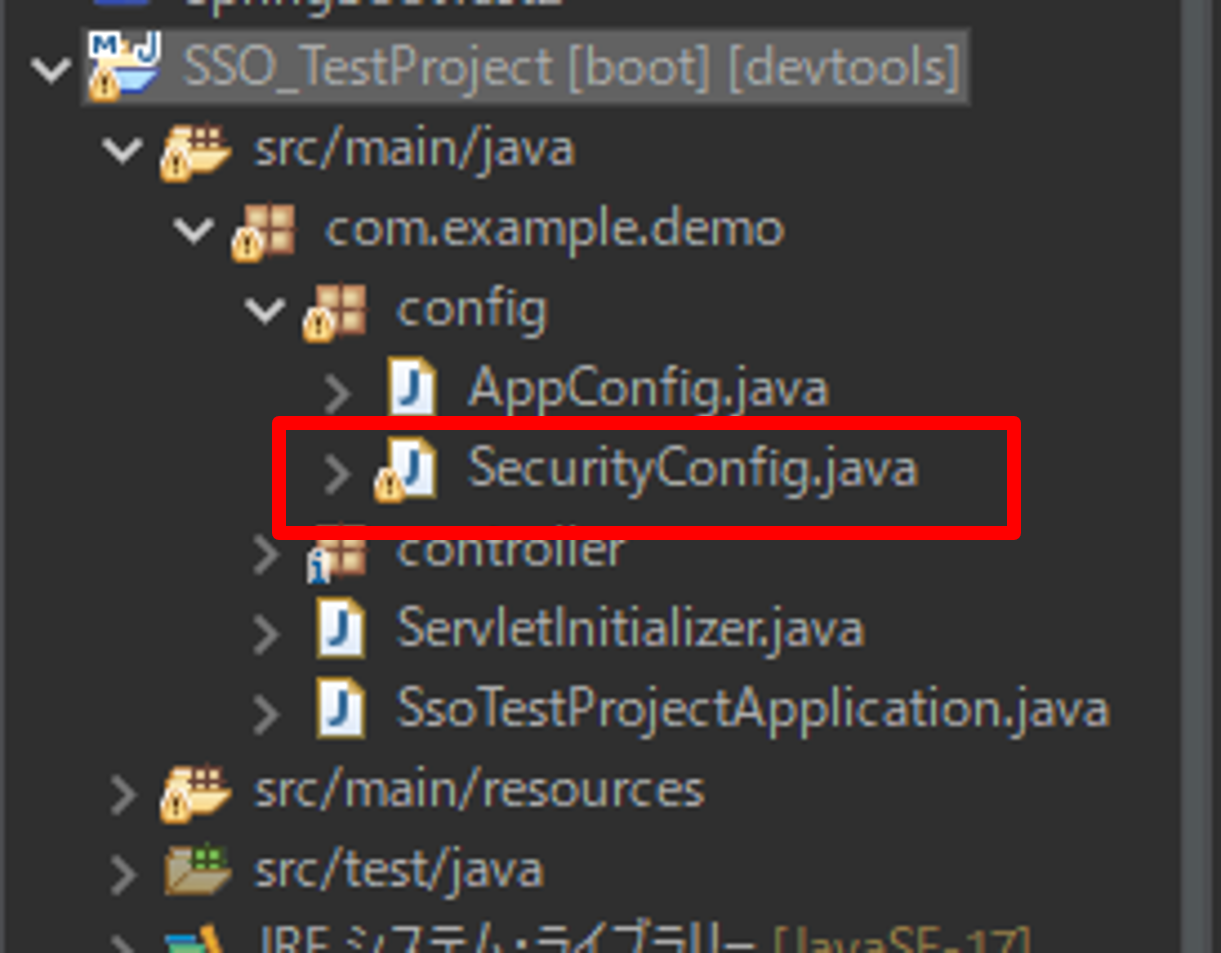
package com.example.demo.config;

import org.springframework.beans.factory.annotation.Autowired;
import org.springframework.context.annotation.Bean;
import org.springframework.context.annotation.Configuration;
import org.springframework.security.config.Customizer;
import org.springframework.security.config.annotation.web.builders.HttpSecurity;
import org.springframework.security.config.annotation.web.configuration.EnableWebSecurity;
import org.springframework.security.core.userdetails.User;
import org.springframework.security.core.userdetails.UserDetails;
import org.springframework.security.crypto.password.PasswordEncoder;
import org.springframework.security.provisioning.InMemoryUserDetailsManager;
import org.springframework.security.saml2.provider.service.registration.RelyingPartyRegistrationRepository;
import org.springframework.security.web.SecurityFilterChain;
import org.springframework.security.web.servlet.util.matcher.MvcRequestMatcher;
import org.springframework.web.servlet.handler.HandlerMappingIntrospector;


@Configuration
@EnableWebSecurity
public class SecurityConfig {

	/*
	 * 認可設定とログインの設定を定義
	 */
	@Bean
	public SecurityFilterChain filterChain(HttpSecurity http, HandlerMappingIntrospector introspector) throws Exception{
		MvcRequestMatcher.Builder mvcMatcherBuilder = new MvcRequestMatcher.Builder(introspector);

		http
		.authorizeHttpRequests(authz -> authz
			// URLごとの認可設定
			// 認証したユーザのみがアクセス可能な画面として、"/top"を用意しておく
			.requestMatchers(mvcMatcherBuilder.pattern("/top*")).hasAuthority("ROLE_USER")
			.anyRequest().permitAll()
		).saml2Login(saml2Login -> saml2Login
			 // SAML 2.0プロトコルの認証設定をカスタマイズする場合は、ここにCustomizerを指定します
			 .defaultSuccessUrl("/top") // 認証成功後のデフォルトのリダイレクト先を設定する場合など)
		 ).saml2Metadata(
	    		Customizer.withDefaults()
		).csrf(
			// CSRFキー有効化設定(デフォルト:有効)
			Customizer.withDefaults()
		);
		return http.build();
	}
}
| .requestMatchers() | .hasAuthority(“ROLE_USER”):ロールuserを持つユーザのみアクセス可能。 .authenticated():認証済みのユーザであれば誰でもアクセス可能。 |
| .saml2Login(saml2Login -> saml2Login) | SAML認証を行うよう設定する |
| .saml2Metadata() | この設定により、metadataが作成される。 ここで作成されたmetadataをkeycloakに渡すことで トラストサークルも設定できる。 |
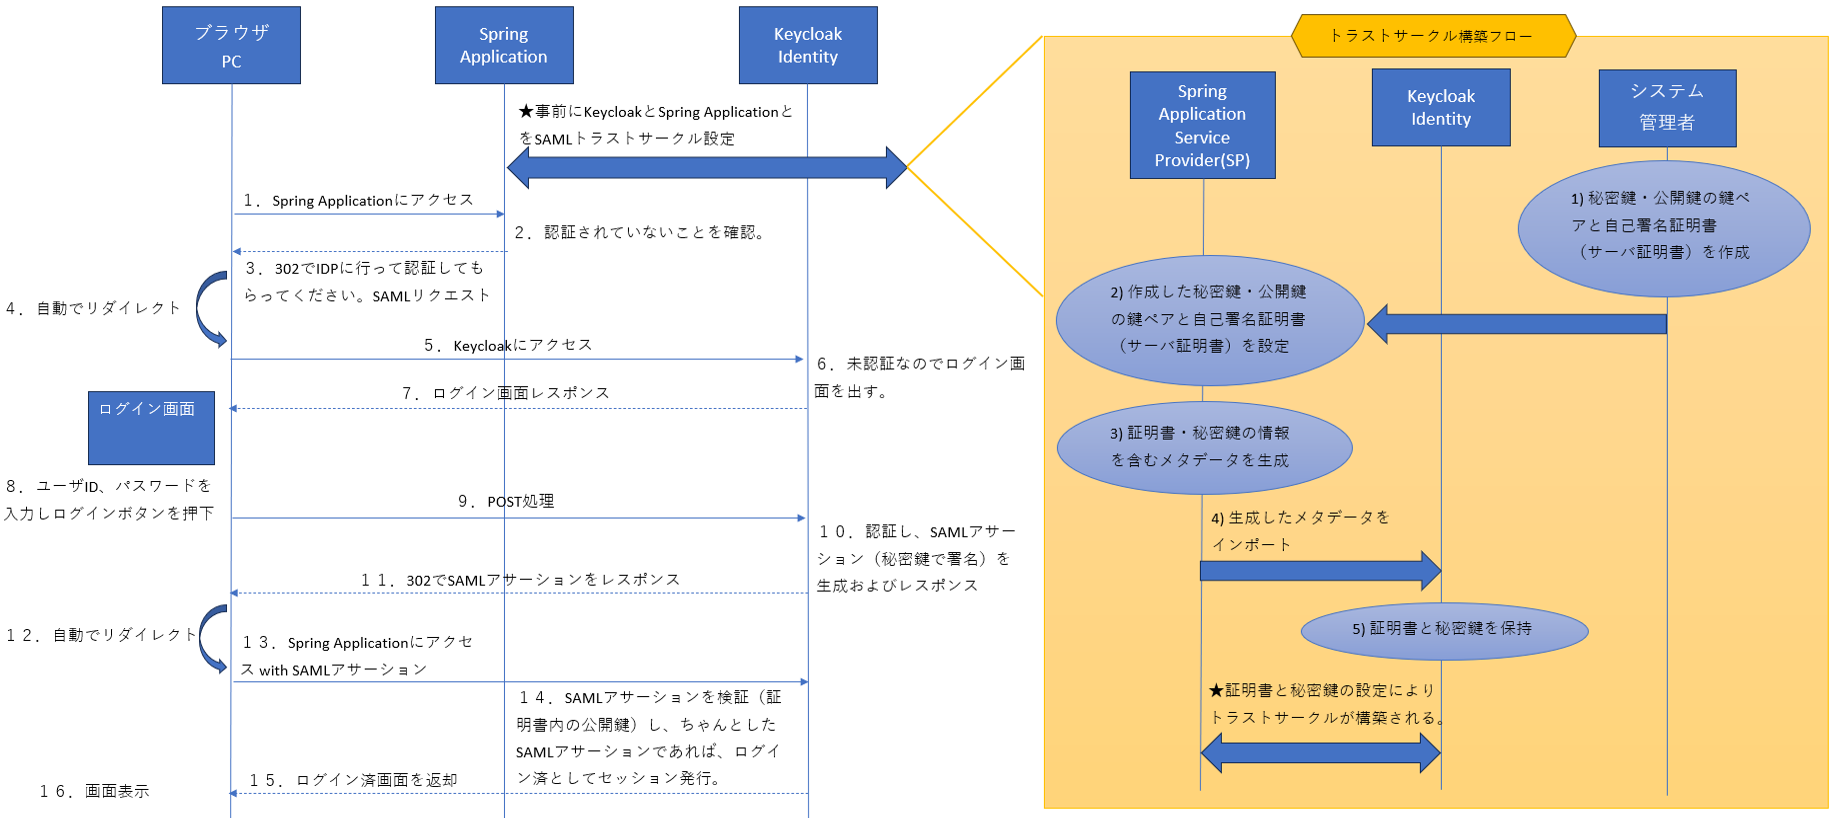
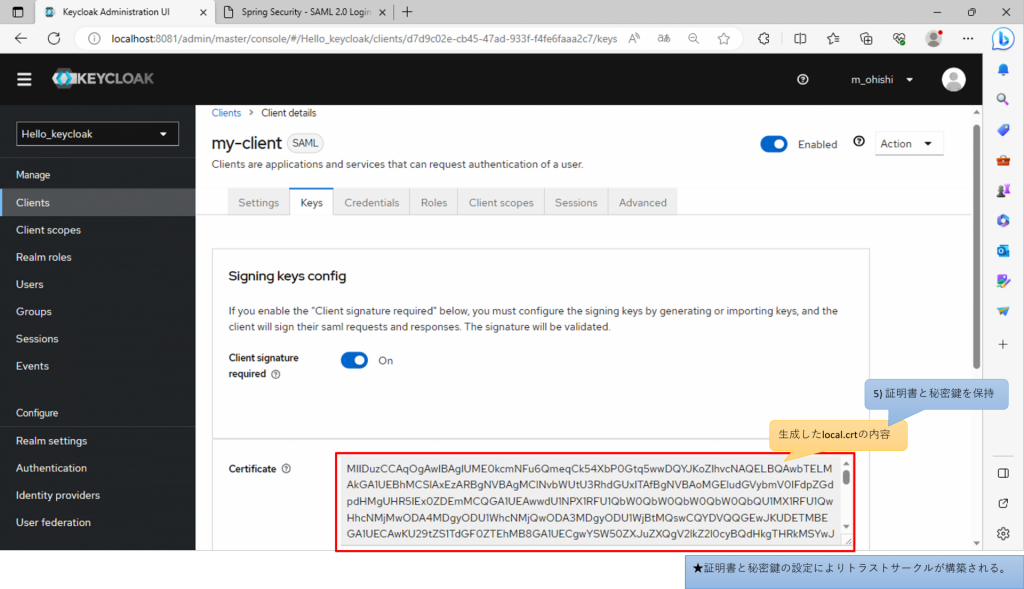
4-2.トラストサークルを設定するための証明書と秘密鍵を作成する。
トラストサークルは、IdPとSPが互いに同じ『証明書と秘密鍵』を持つことで成り立つ。サーバ証明書を使うことにより送信先の成りすましが防止される。秘密鍵での署名により、データの完全性を確保することができる。
証明書:データの送信者の正当性を証明するための電子的な証明書。個人や組織の識別情報と公開鍵を含む。
証明書は公開される情報であるため、第三者による不正利用を防ぐために慎重に保管する必要がある。
秘密鍵:データの署名に使用される。署名をすることで、そのデータが改ざんされていないことを確認できる。
秘密鍵は絶対的に秘密に保管される必要がある。他の人が秘密鍵にアクセスできれば、その人は署名や解読が可能となってしまう。
通信の際には、証明書によるデータの署名を通じて、情報の送信者が本物であることと、データが改ざんされていないことを確認する。
コマンドプロンプトを起動して、下記コマンドを実行する。
openssl req -newkey rsa:2048 -nodes -keyout local.key -x509 -days 365 -out local.crt実行すると、Country Name等[個人や組織の識別情報]の入力を要求される。今回はテストなので、何も入力せずEnterでOK。
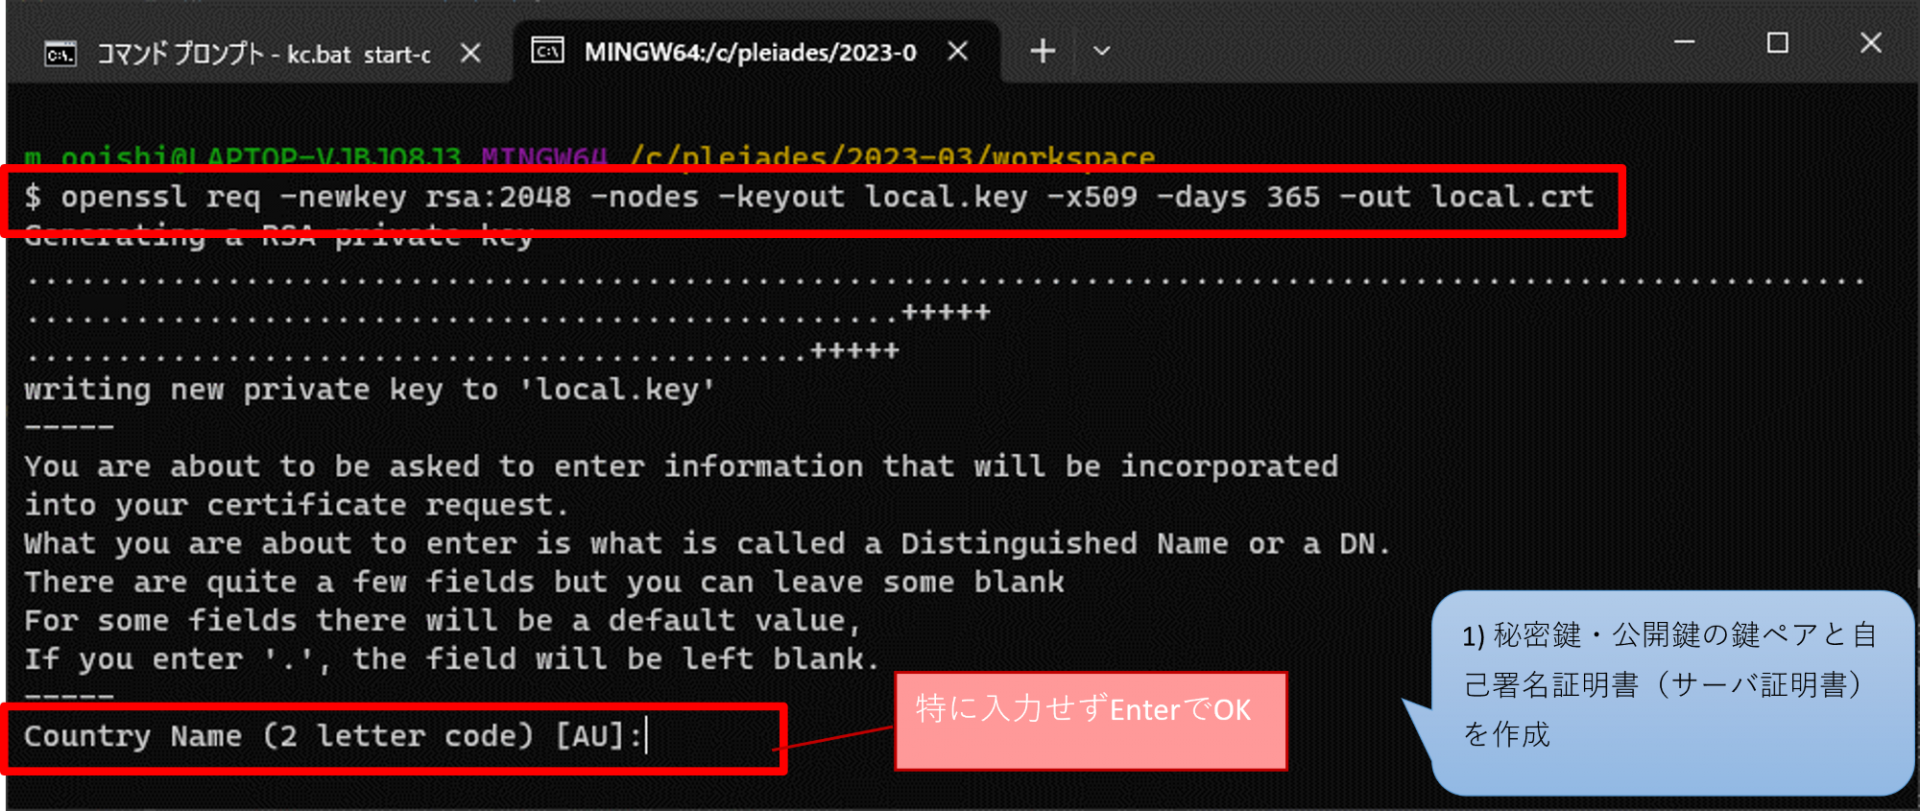
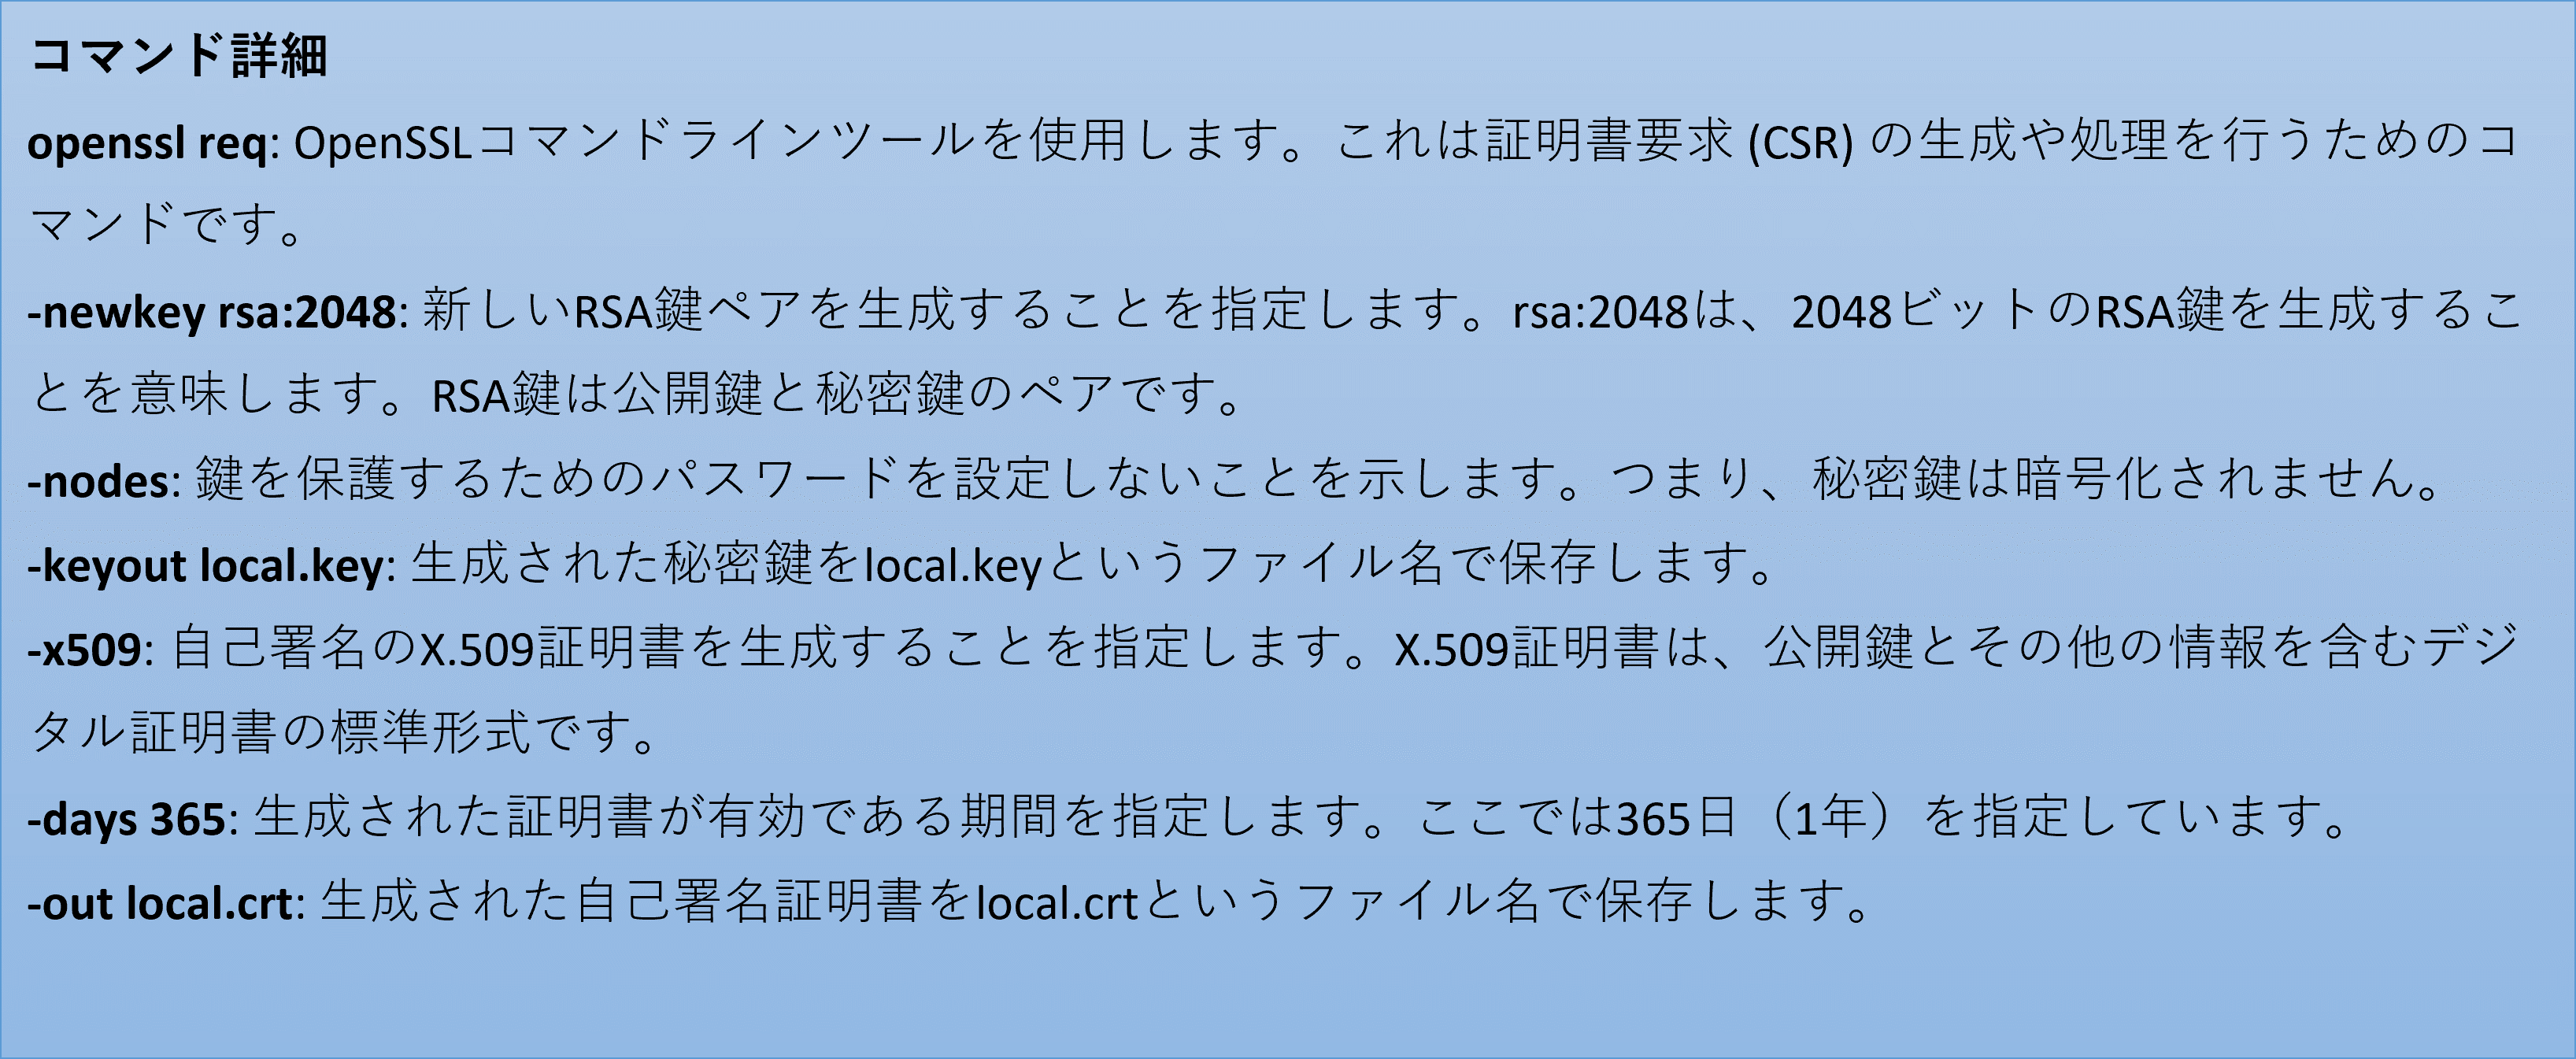
コマンドが正常に実行されると、local.keyとlocal.crtが作成される。
次の手順から、ここで作成した証明書と秘密鍵を共有することでトラストサークルを構築していく。
4-3.application.ymlにSAML認証の各種設定を記載する。
spring:
    security:
        saml2:
            relyingparty:
                registration:
                    my-client:	#任意の値
                        entity-id: my-client	#ここで指定した値がkeycloakのクライアントIDとなる
                        signing:
                            credentials:
                            - private-key-location: classpath:credentials/local.key #生成した秘密鍵と証明書を指定
                               certificate-location: classpath:credentials/local.crt	#ファイルはsrc/main/resources/credentialsに配置しておく
                        assertingparty:
                            # keycloakのmetadataを取得するためのURL
                            # [keycloakホスト]/realms/[レルム名]/protocol/saml/descriptor
                            metadata-uri: http://localhost:8081/realms/Hello_keycloak/protocol/saml/descriptor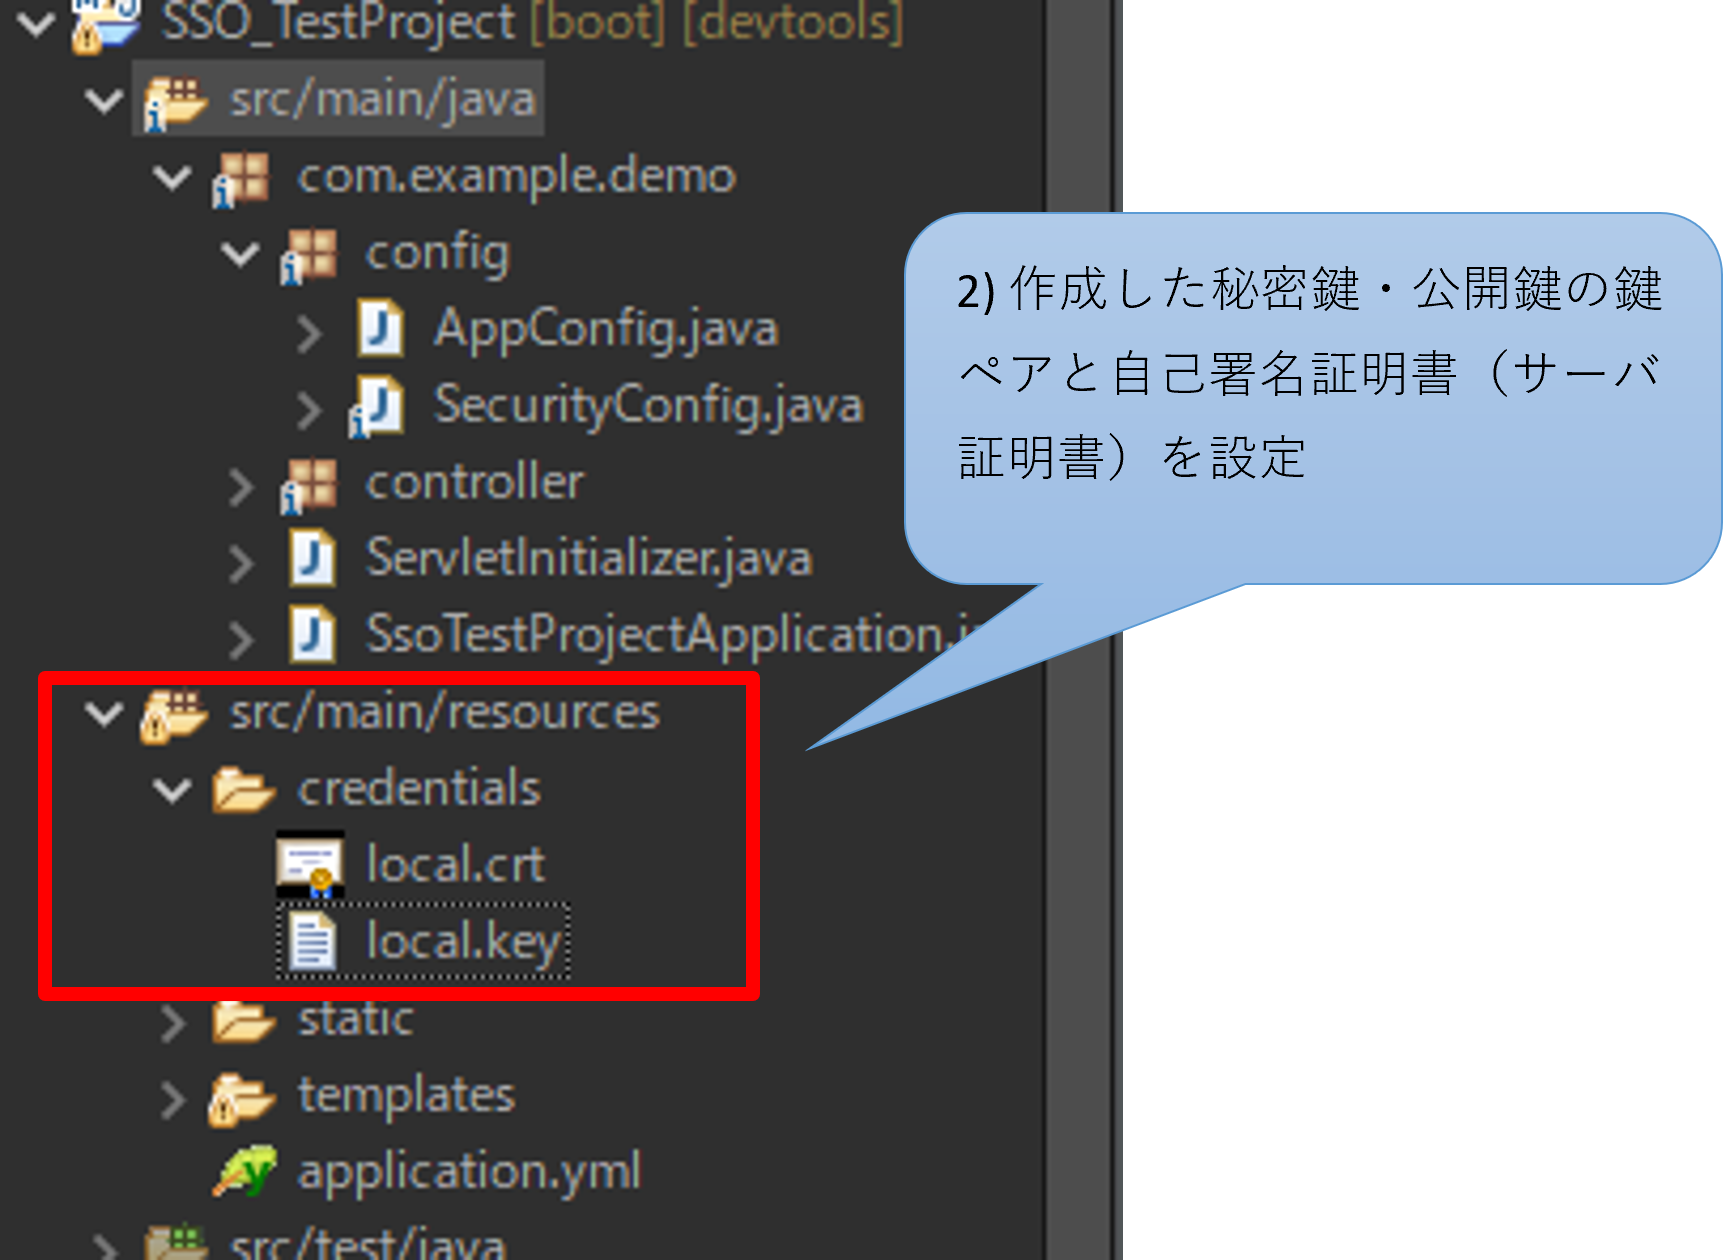
4-4.アプリケーションを起動し、keycloakに渡すためのmetadataを取得する。
起動して下記URLにアクセスするとsaml-my-client-metadata.xmlがダウンロードされる
※証明書と秘密鍵の情報を含むメタデータを生成
※”my-client”はymlで設定した値
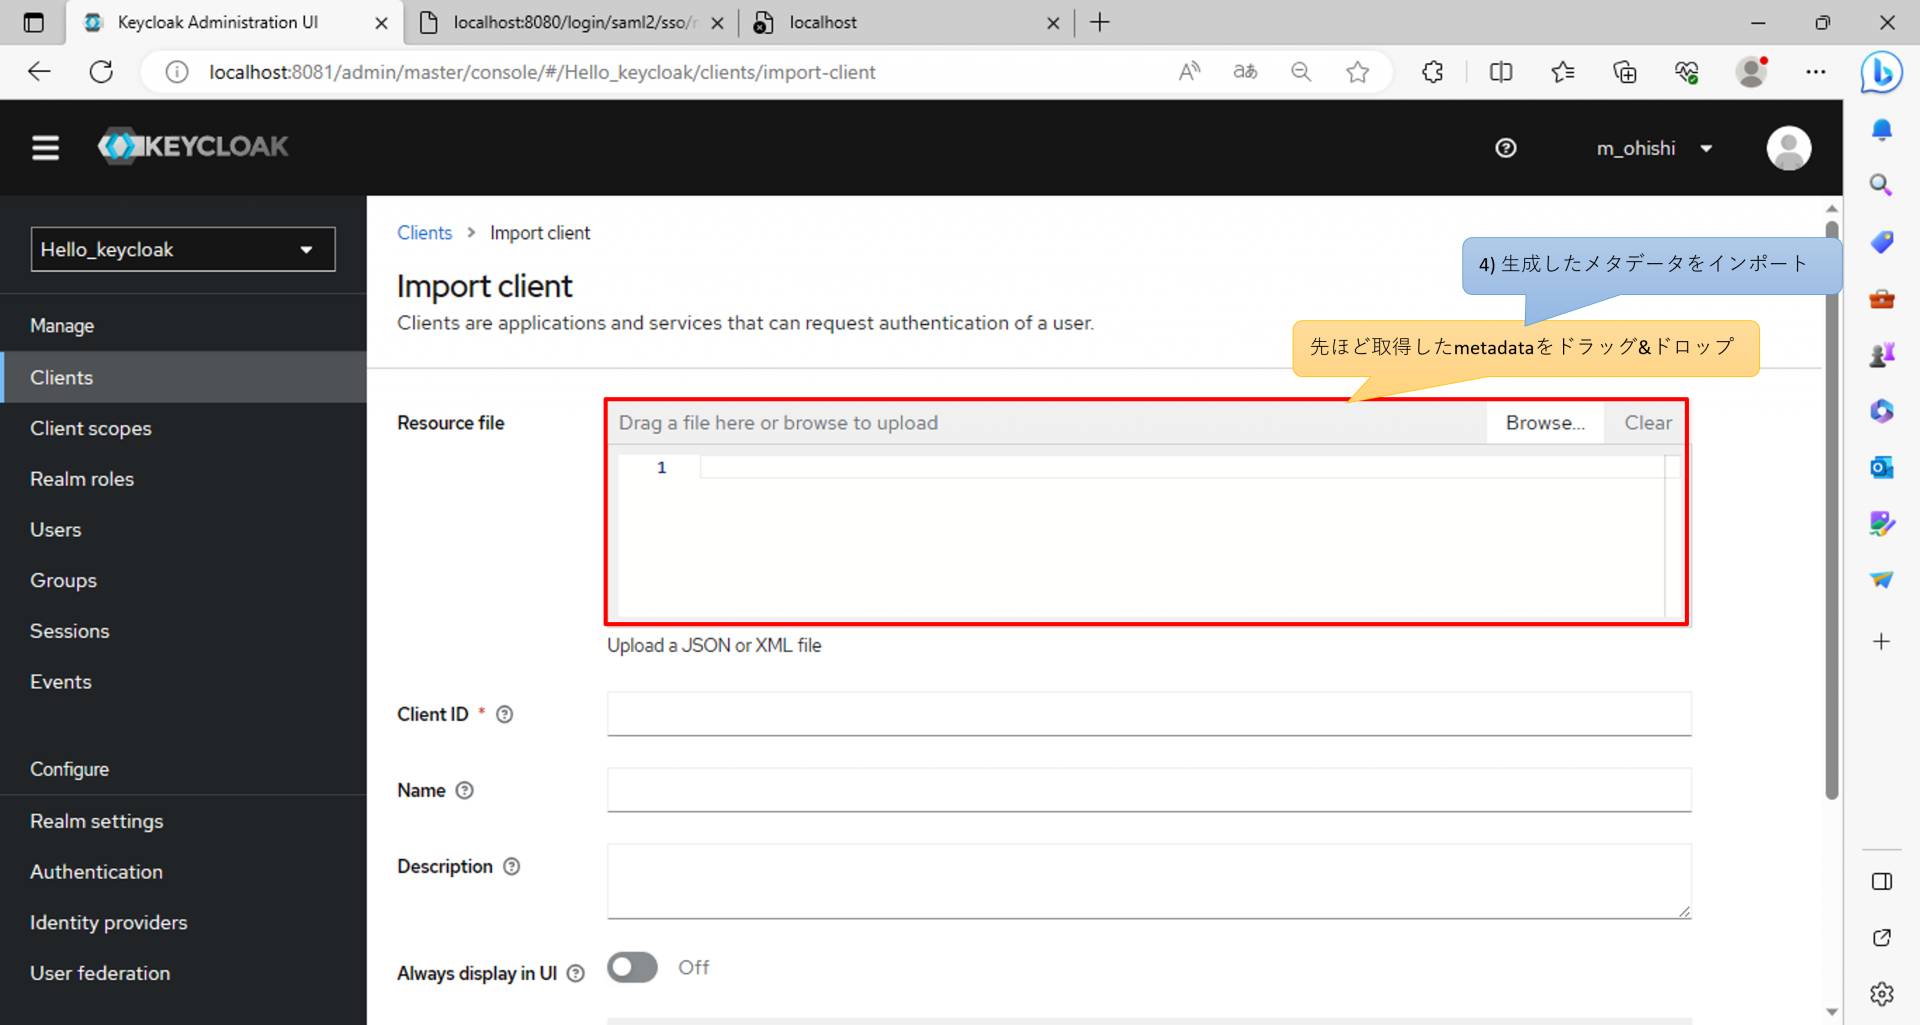
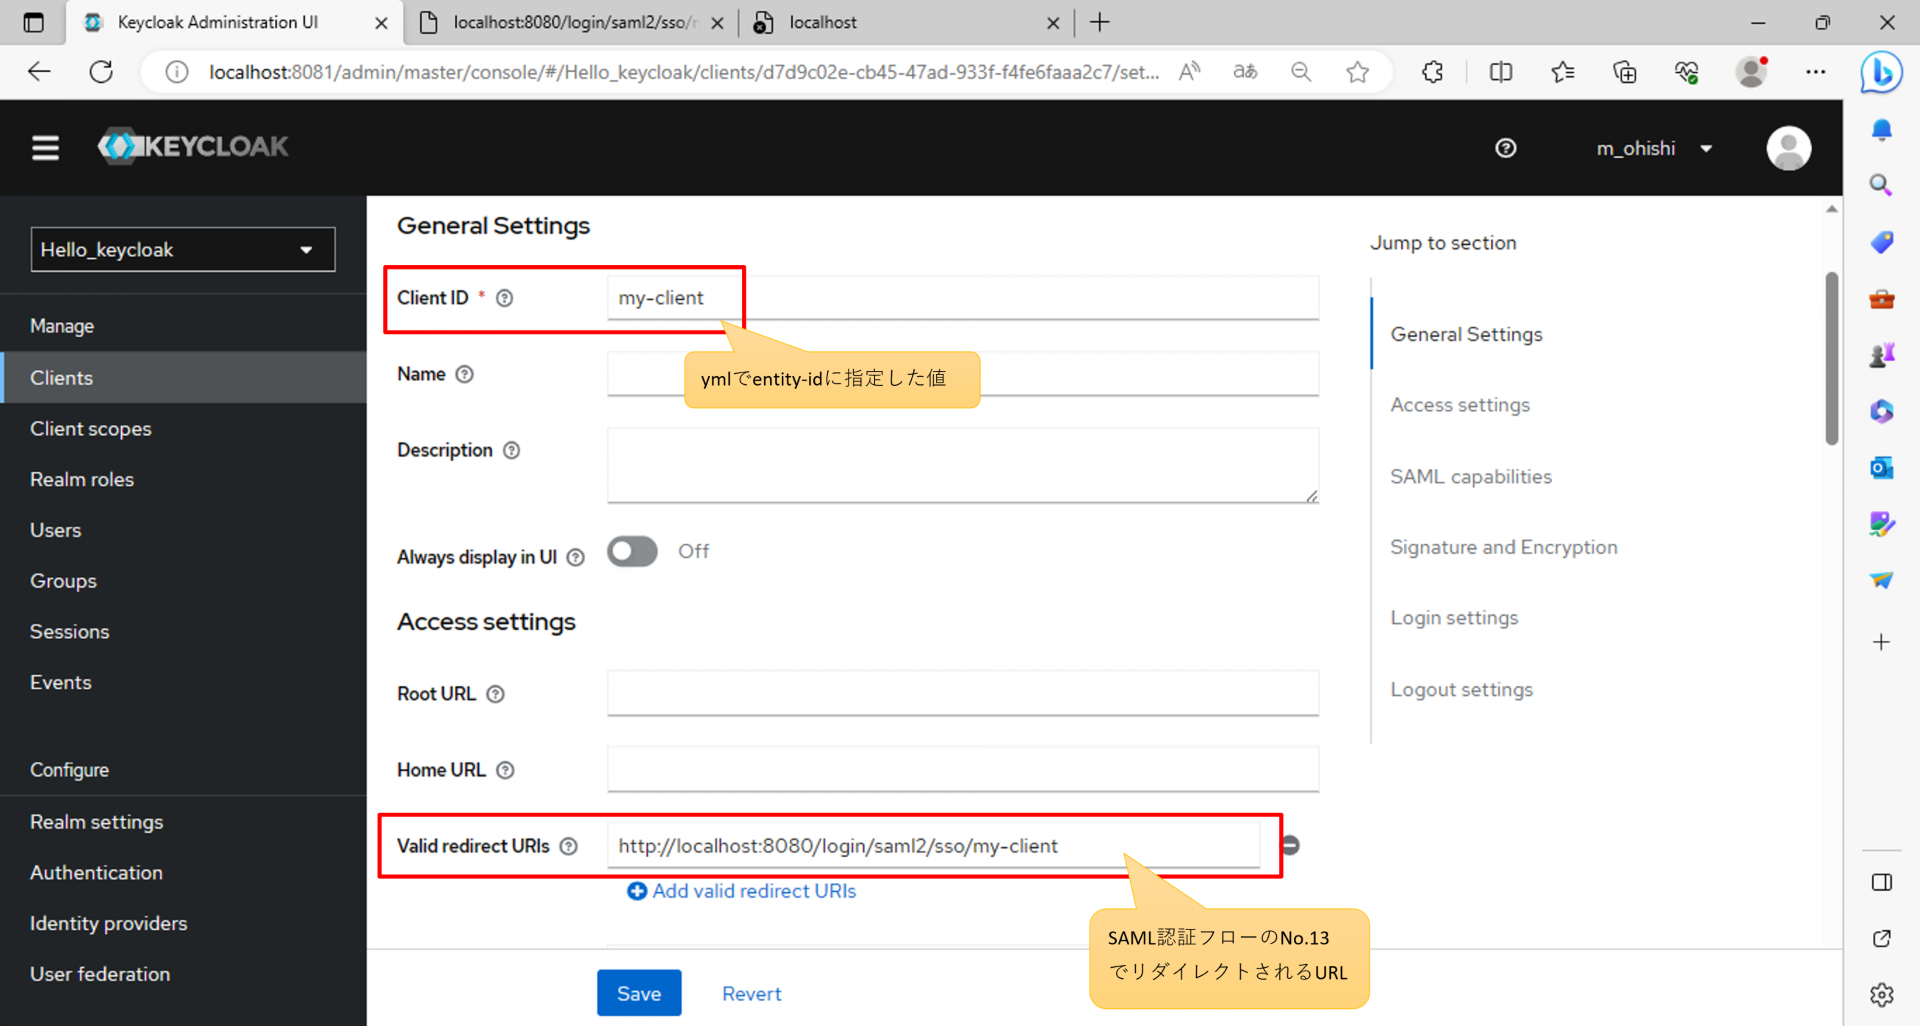
http://localhost:8080/saml2/service-provider-metadata/my-client4-5.ダウンロードしたmetadataからkeycloakのクライアントを作成する。
Keycloakで作成したレルムのClientsタブへ遷移し、Import clientをクリックする。
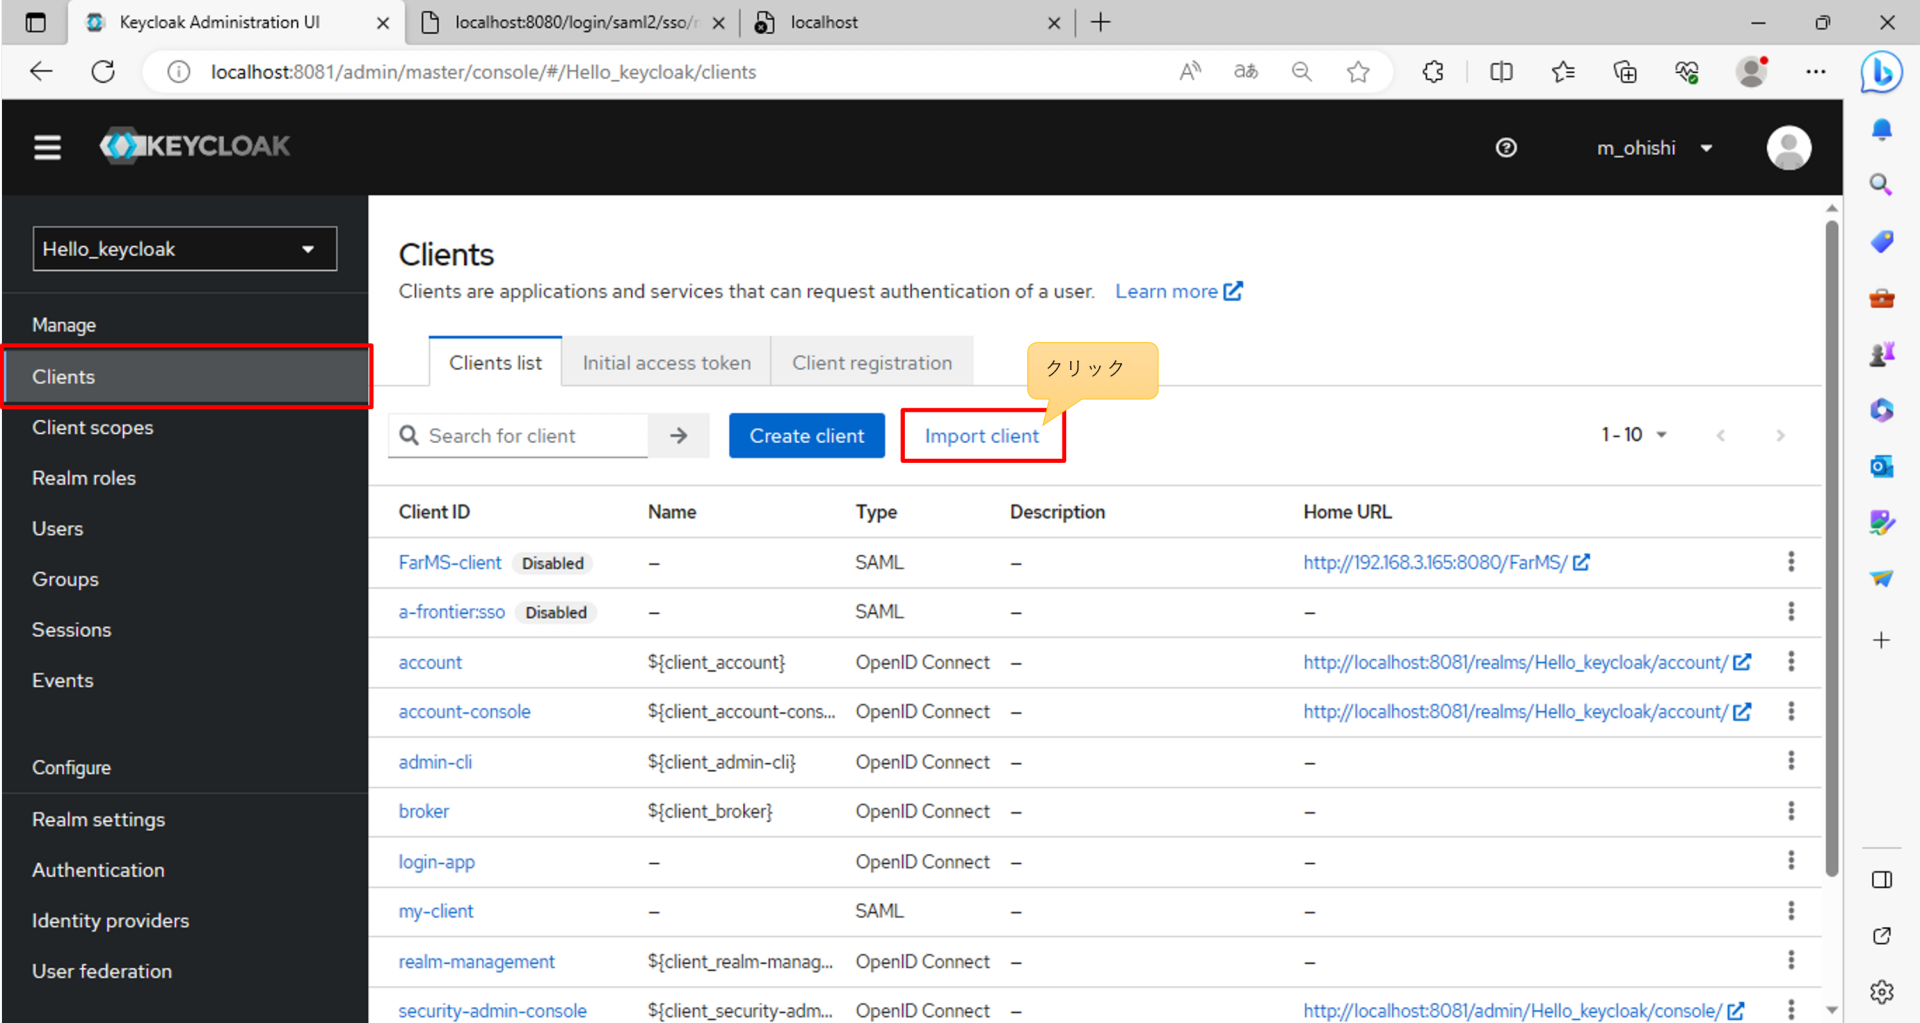
先ほどダウンロードしたmetadataをインポートする。
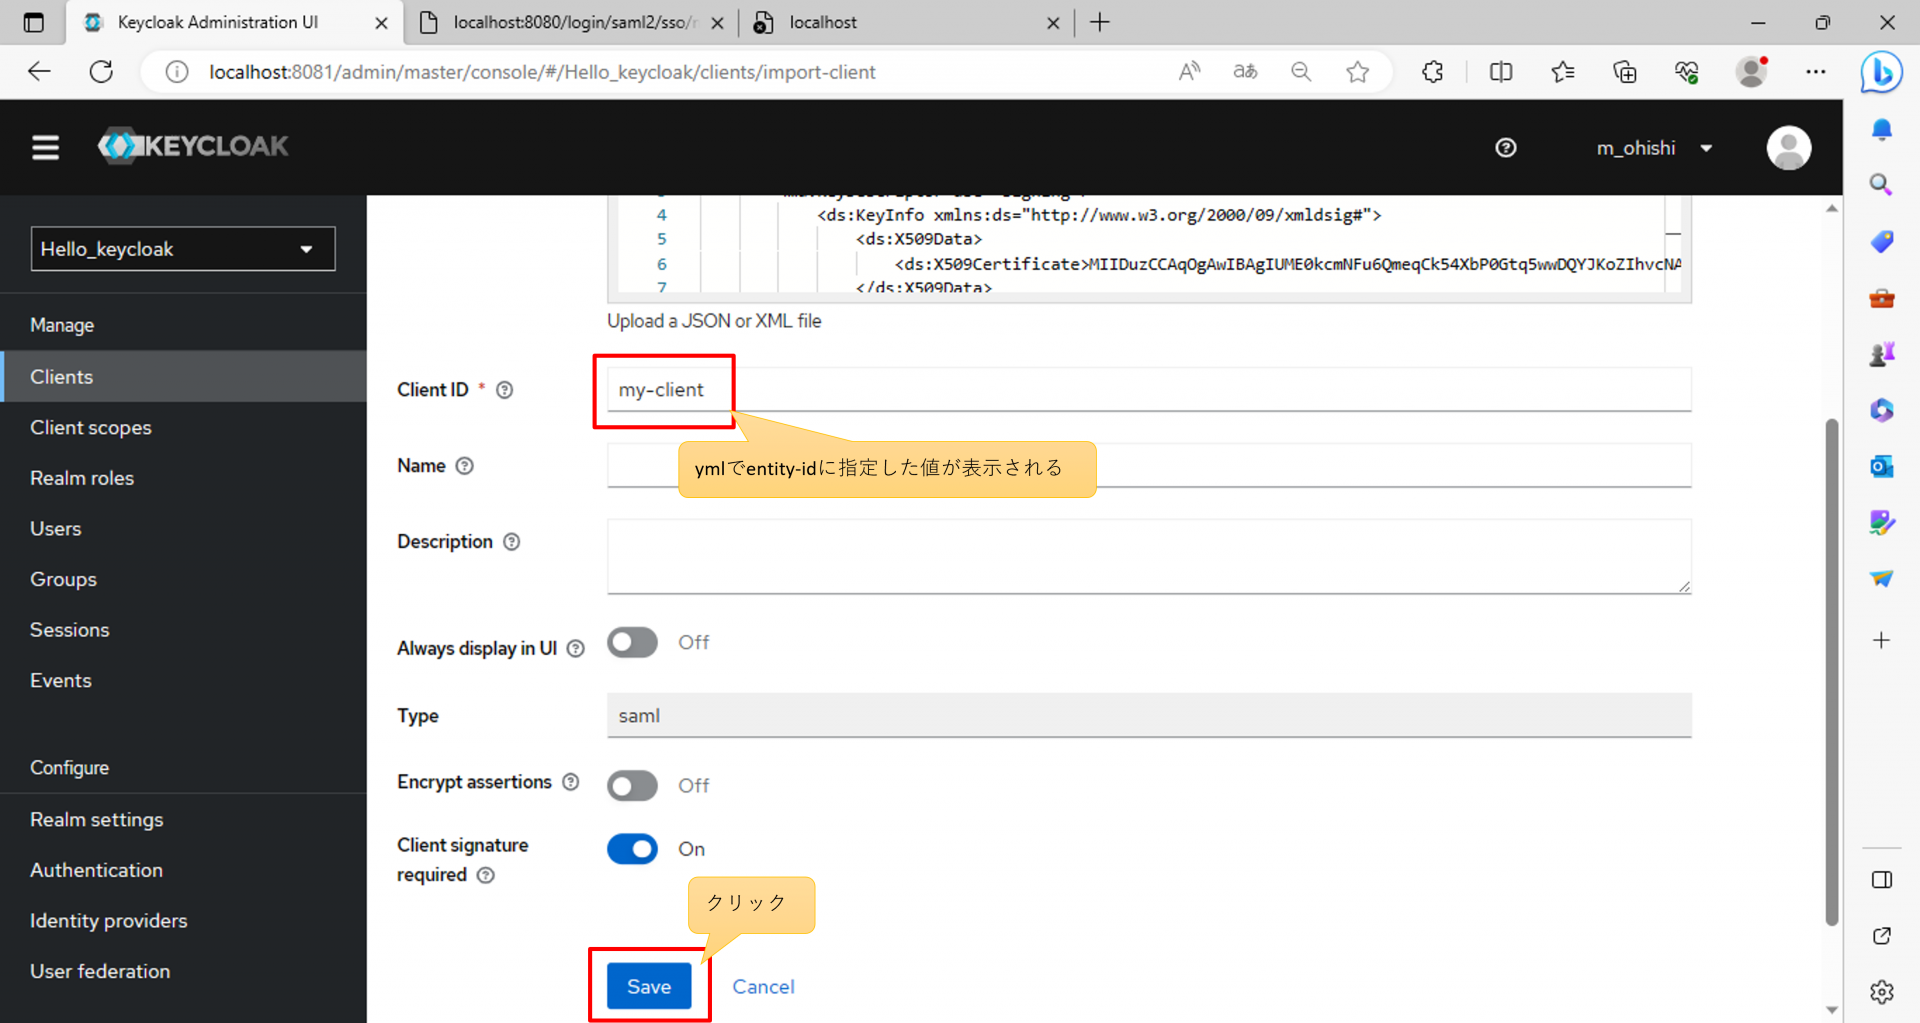
作成されたクライアントの設定値例
5.動作確認
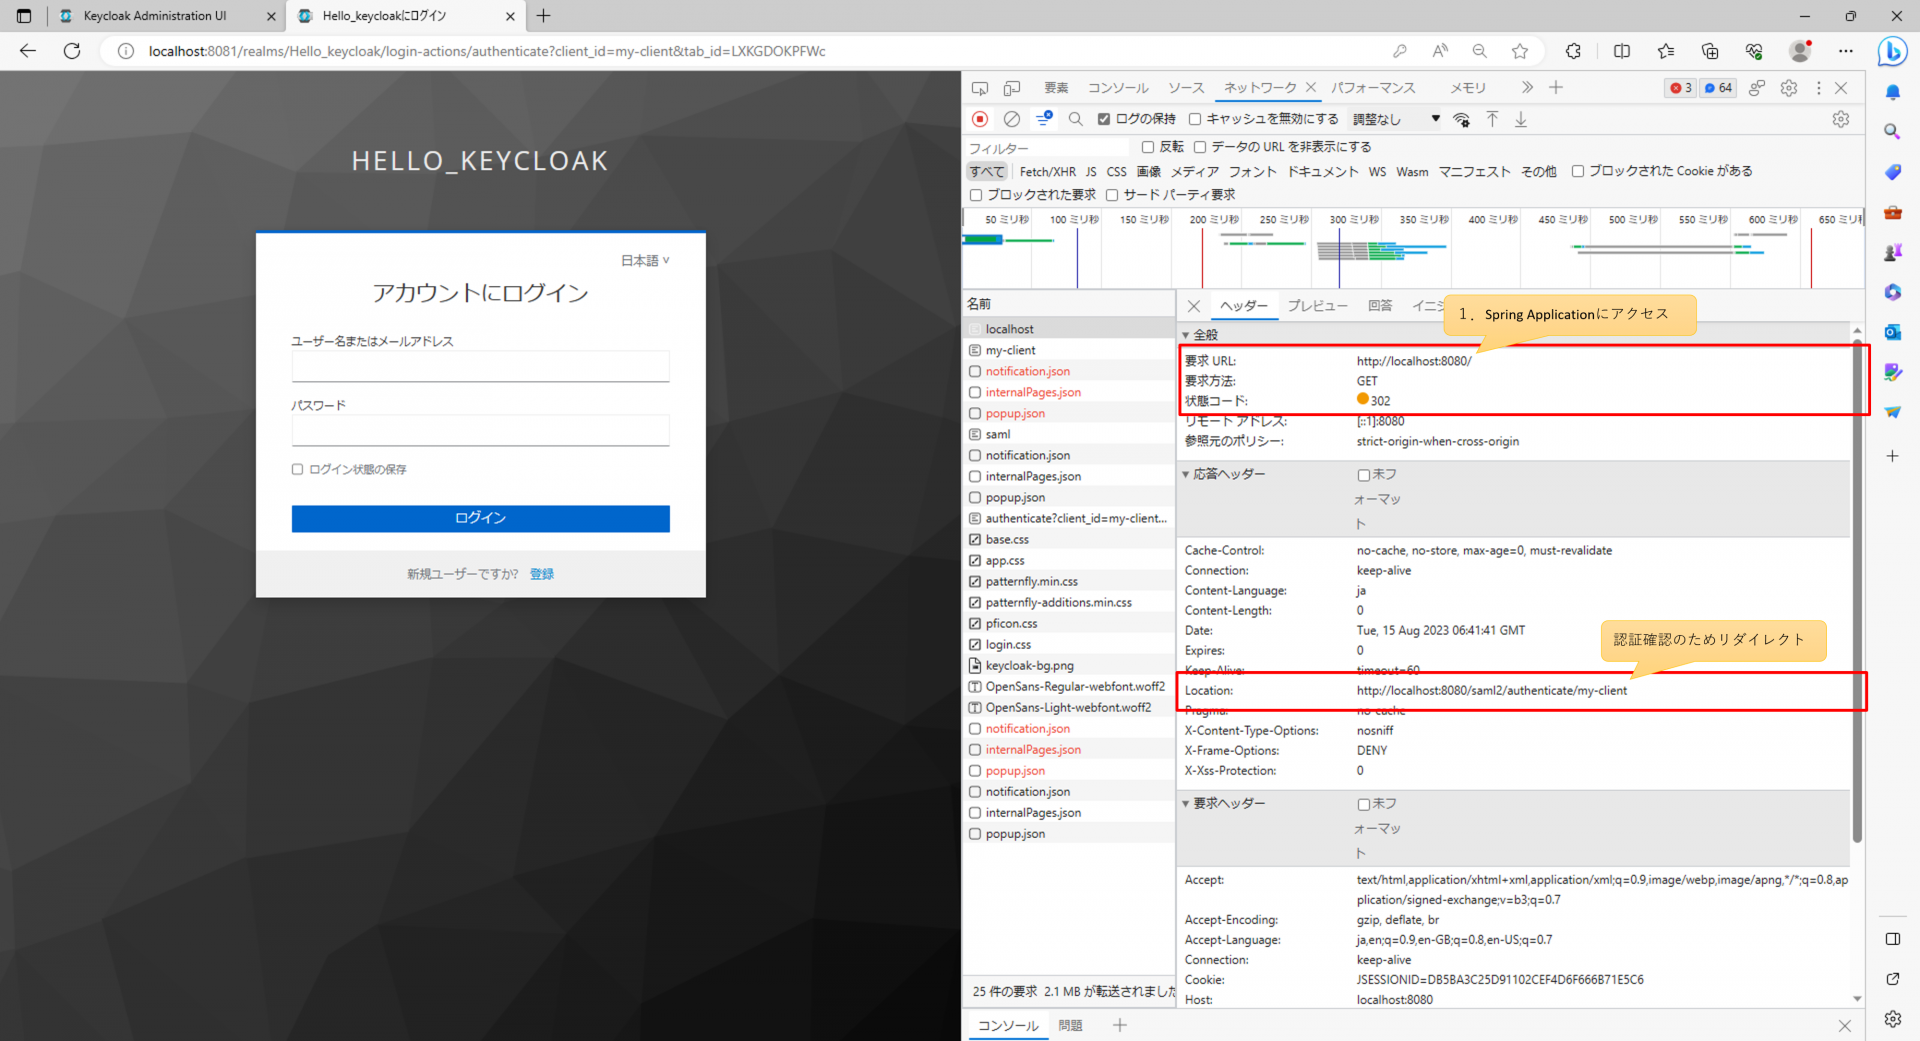
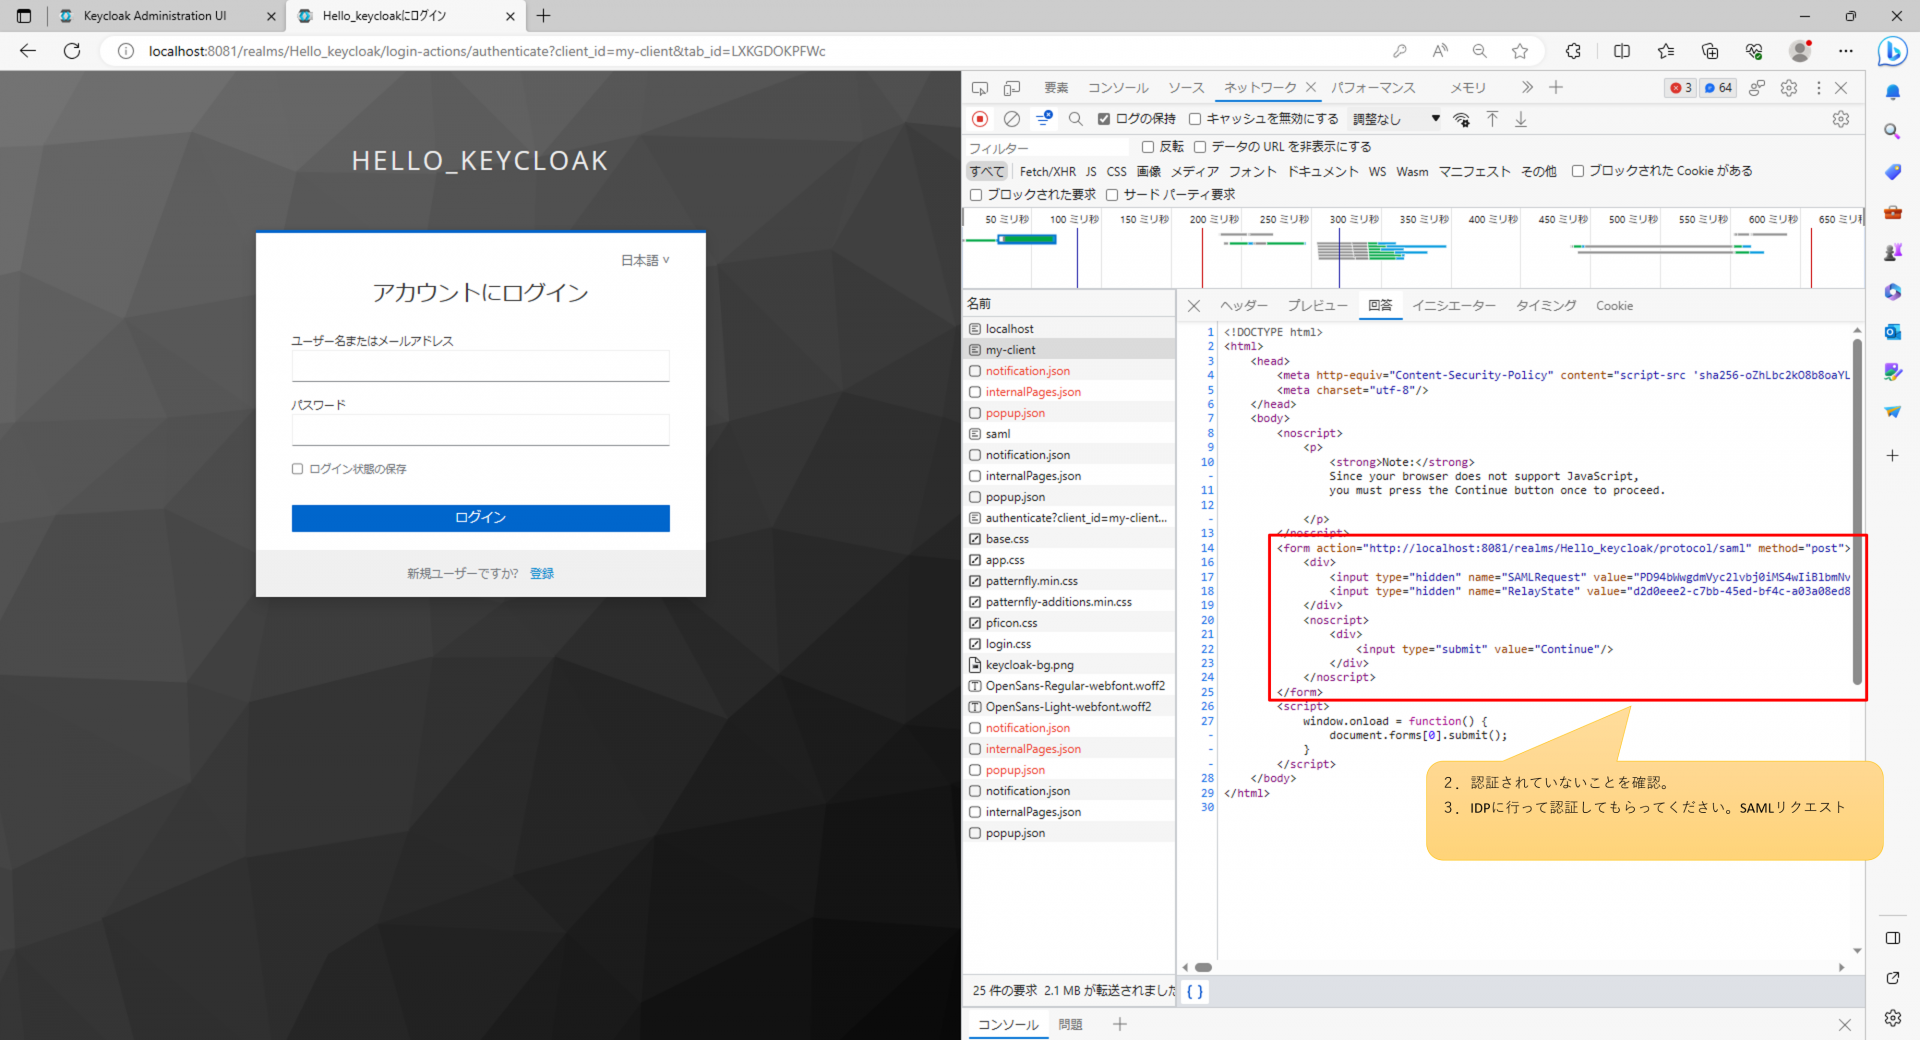
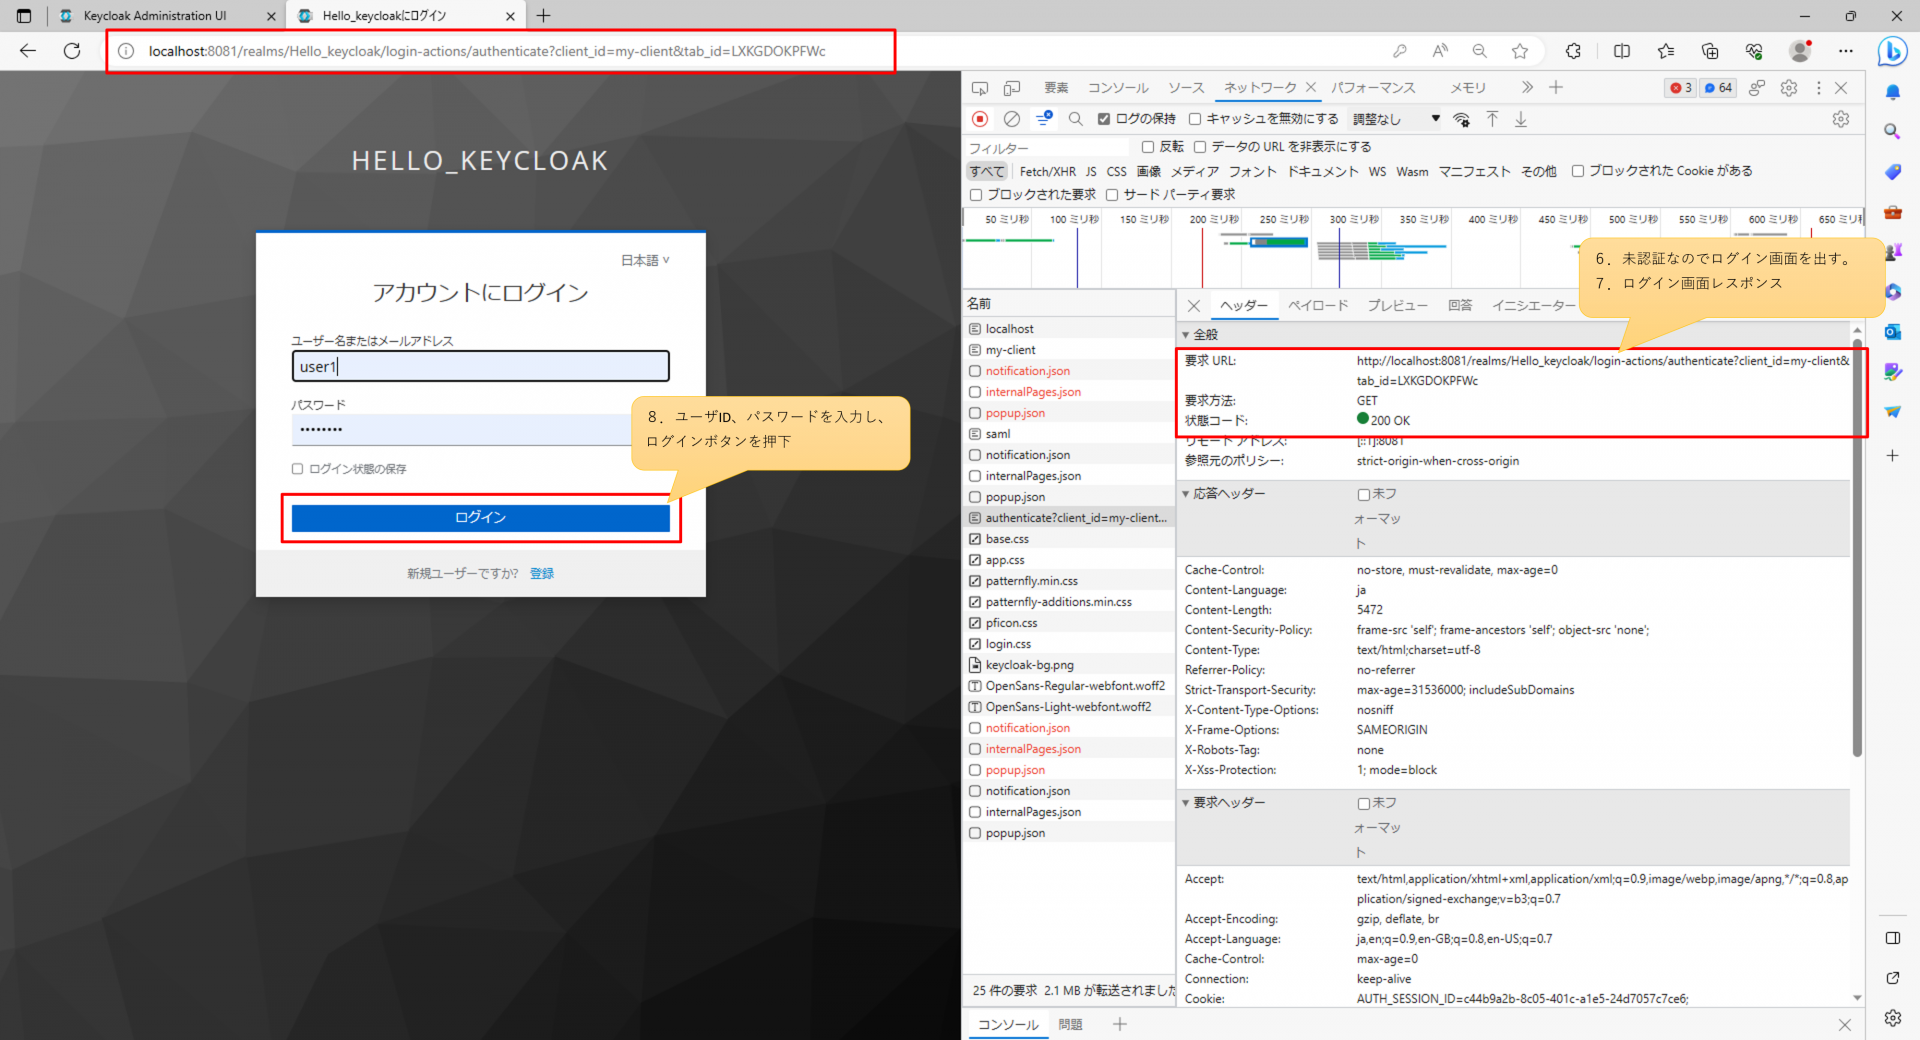
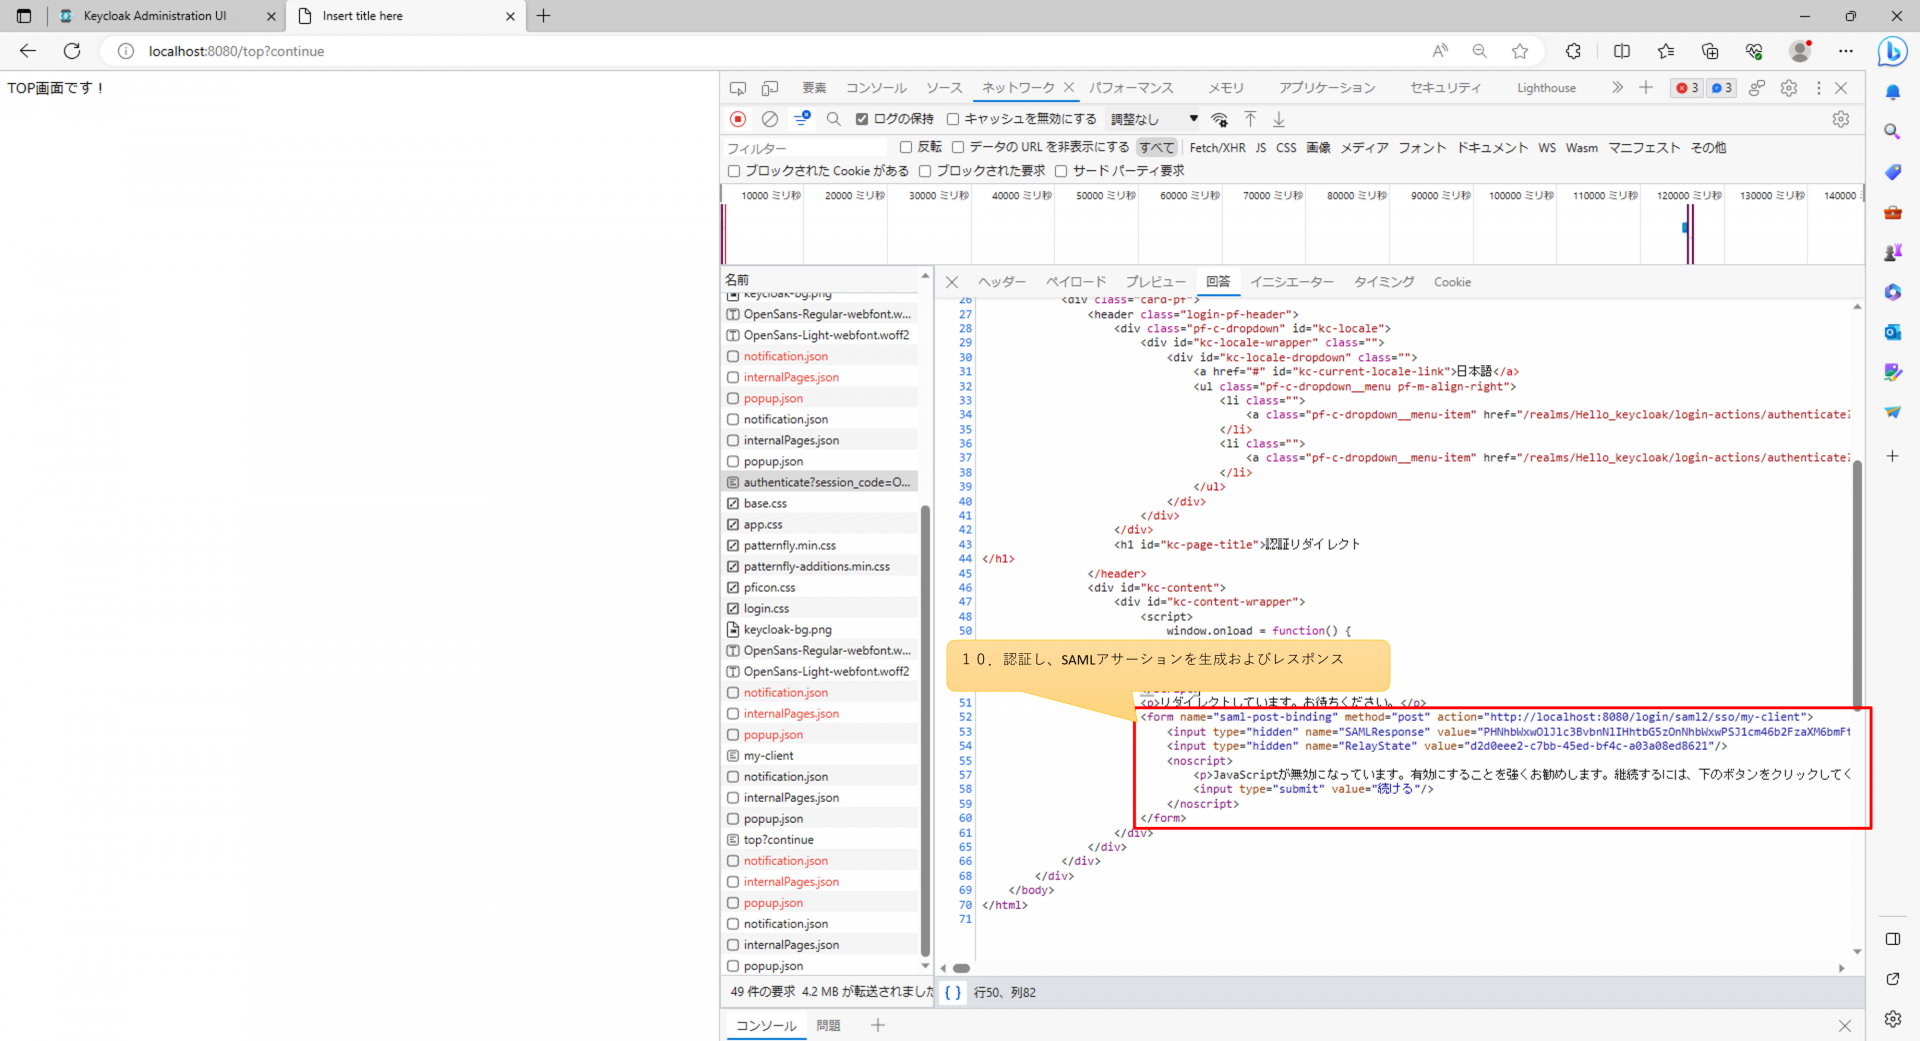
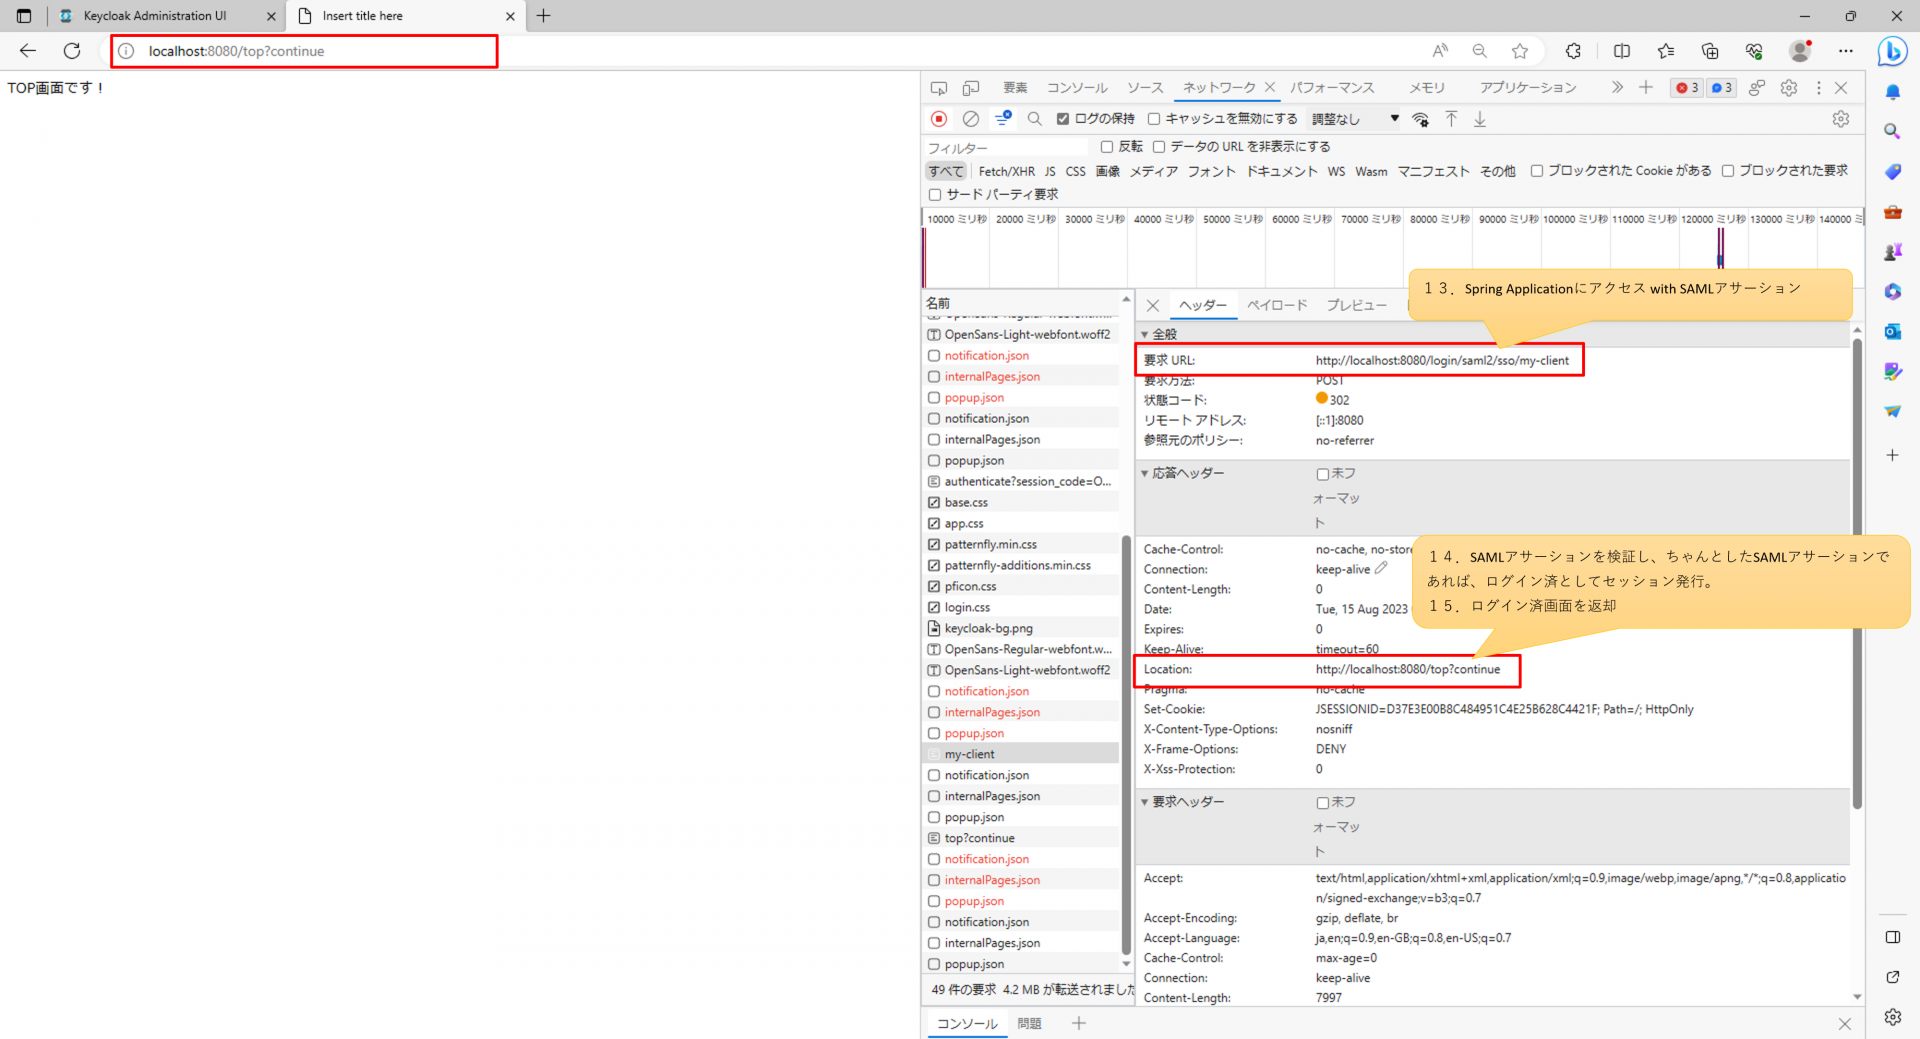
下記の番号はすべて「●SAML認証フロー」に対応している。
Spring Applicationにアクセス
http://localhost:8080/top